You're viewing Apigee and Apigee hybrid documentation.
View
Apigee Edge documentation.
ResourceDoesNotExist
Error Message
Deployment of the API proxy through either the Apigee UI or API fails with this error message:
Error Deploying Revision <var>revision_number</var> to <var>environment</var>
Resource with name <var>ResourceURL</var> and type java does not exist.
Example Error Message
Error Deploying Revision 1 to test
Resource with name myresource.jar and type java does not exist.
Example Error Screenshot

Cause
If the resource specified in the <ResourceURL> element in the JavaCallout policy does not exist at the API proxy or environment level, then the deployment of the API proxy fails.
Diagnosis
Identify the environment and resource name. You can find this information in the error message. For example, in the following error the environment is
testand the resource name used in the <ResourceURL>element ismyresource.jar.Error Deploying Revision 1 to test Resource with name myresource.jar and type java does not exist.Determine the JavaCallout policy that is using the resource identified in step #1 above.
For example, the following policy specifies the value of <
ResourceURL>asmyresource.jar, which matches with the value in the error message:<?xml version="1.0" encoding="UTF-8" standalone="yes"?> <JavaCallout name="hello-java"> <ClassName>com.apigeesample.HelloJava</ClassName> <ResourceURL>java://myresource.jar</ResourceURL> </JavaCallout>Determine if the resource is either part of the API proxy that is failing or uploaded at the environment level. If not, then this is the cause of the error.
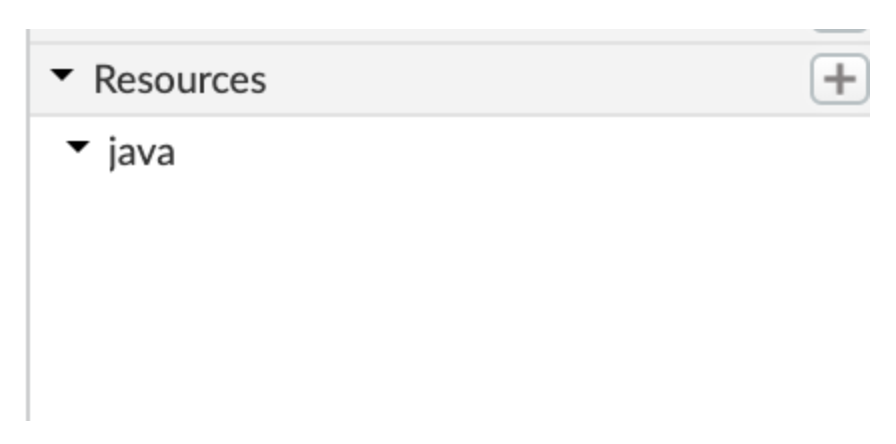
Navigate to the Resources tab in the Navigator pane of the API proxy editor to view all the resources uploaded at the API proxy level. In this example the API proxy has no resources uploaded.

Resources can be available at the environment level. For more information, see Resource files.
To determine if the resource exists at the environment level, issue the following API call using curl:
curl \
"https://apigee.googleapis.com/v1/organizations/$ORG/environments/$ENV/resourcefiles/java/myresource.jar" \
-H "Authorization: Bearer $TOKEN"
Where
$TOKENis set to your OAuth 2.0 access token, as described in Obtaining an OAuth 2.0 access token. For information about thecurloptions used in this example, see Using curl. For a description of the environment variables used, see Setting environment variables for Apigee API requests.
If you receive a 404 status code as the response for these APIs, then the resource is missing at the environment level.
If the resource is not available at the API proxy and environment level, the deployment error is returned:
Resource with name myresource.jar and type java does not exist.
 ```
Resolution
Ensure that the resource specified in the <ResourceURL> element does exist at the API proxy or environment level. For more information, see Managing resources.
To correct the example JavaCallout policy shown above, upload the JAR file at the appropriate level (API proxy or environment level).
NoResourceForURL
Error Message
Deployment of the API proxy through either the Apigee UI or API fails with this error message:
Error in deployment for environment <var>environment</var>
The revision is deployed, but traffic cannot flow. Could not locate a resource with URL <var>ResourceURL</var>
Example Error Message
Error in deployment for environment test
The revision is deployed, but traffic cannot flow. Could not locate a resource with URL java://myresource.jar
Example Error Screenshot

Cause
This error may occur if resource file is either corrupted or partially uploaded, even though it appears to exist at the API proxy or environment level.
Diagnosis
Identify the environment and the resource name. You can find this information in the error message. For example, in the following error, the environment name is
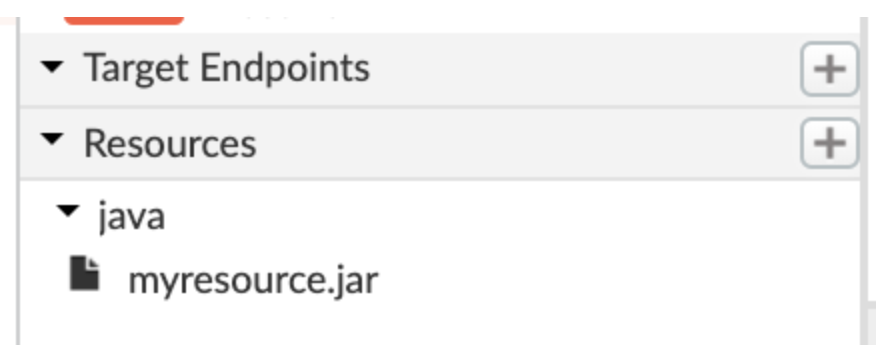
testand the Resource Name used in the <ResourceURL>element ismyresource.jar.Error in deployment for environment test The revision is deployed, but traffic cannot flow. Could not locate a resource with URL java://myresource.jarEnsure that the resource is uploaded at the API proxy or environment level. In the example below, you can see that resource
myresource.jaris uploaded at the API proxy level.
Resources can be available at the environment level. For more information, see Resource files.
To determine if the resource exists at the environment level, issue the following API call using curl:
curl \
"https://apigee.googleapis.com/v1/organizations/$ORG/environments/$ENV/resourcefiles/java/myresource.jar" \
-H "Authorization: Bearer $TOKEN"
Where
$TOKENis set to your OAuth 2.0 access token, as described in Obtaining an OAuth 2.0 access token. For information about thecurloptions used in this example, see Using curl.If you receive a 404 status code as the response for these APIs, then the resource is missing at the environment level.
Resolution
- If you determine that the resource exists at the API proxy or environment level, delete the resource and re-upload it, as described in step 2. Otherwise, skip to step 3.
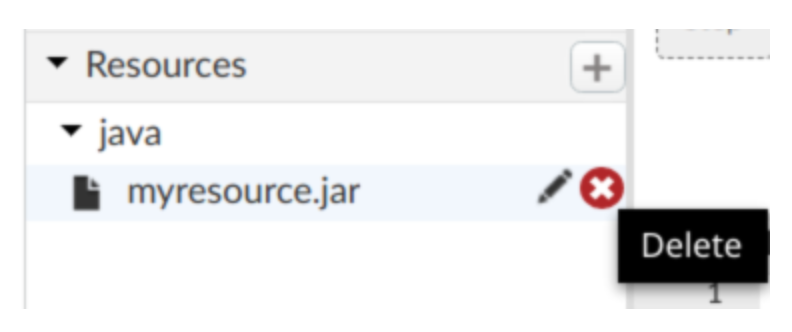
To delete the resource at the API proxy level, navigate to the Resources tab in the Navigator pane of the API proxy editor and click the "X" button next to the resource as shown below.

To delete resource at the environment, use the DELETE verb on the API calls that were used previously in diagnosis steps. For example, to delete the resource at the environment level, enter the following command:
curl -X DELETE \
"https://apigee.googleapis.com/v1/organizations/$ORG/environments/$ENV/resourcefiles/java/myresource.jar" \
-H "Authorization: Bearer $TOKEN"
Where
$TOKENis set to your OAuth 2.0 access token, as described in Obtaining an OAuth 2.0 access token. For information about thecurloptions used in this example, see Using curl.Upload the JAR file) at the appropriate level (API proxy or environment level.
If re-uploading the resource doesn't help, contact Apigee Support.
JavaCalloutInstantiationFailed
Error Message
Deployment of the API proxy through either the Apigee UI or API fails with this error message:
Error in deployment for environment <var>environment</var>
The revision is deployed, but traffic cannot flow. Failed to instantiate the JavaCallout Class <var>class_name</var>
Or
Error in deployment for environment <var>environment</var>.
The revision is deployed and traffic can flow, but flow may be impaired. Failed to instantiate the JavaCallout Class <var>class_name</var>
Example Error Message
Error in deployment for environment test
The revision is deployed, but traffic cannot flow. Failed to instantiate the JavaCallout Class my.class
Example Error Screenshot

Cause
Here are typical causes for this error
| Cause | Description |
| Missing JAR file | The JAR file containing the Java class identified in the error is not uploaded. |
| Corrupted JAR file | The JAR file containing the Java class identified in the error is corrupted/partially uploaded. |
| Missing Class file | The Java class file identified in the error is not part of the JAR file specified in >ResourceURL< or dependent JAR files. |
| Java Code Issue | There is an error in the code, such as a missing constructor, code dependency issue, or other issue. |
Common Diagnosis Step
Identify the name of the environment and the Class that failed to be imported. For example in the following error message environment name is
testand Class name ismy.class:Error in deployment for environment test The revision is deployed, but traffic cannot flow. Failed to instantiate the JavaCallout Class my.class
Cause: Missing JAR file
Diagnosis
- Determine the JAR file that is supposed to contain the class (identified in step #1 above) and that could not be instantiated.
- Check if the specific JAR file is uploaded at the API proxy or environment level. If the JAR file is not uploaded to any of the levels, then go to Resolution.
- If the JAR file is uploaded, then go to Cause: Corrupted JAR File.
Resolution
- If the JAR file is corrupted or partially uploaded, then rebuild the JAR and upload the JAR file at the appropriate level (API proxy or environment level).
- Redeploy the API proxy.
Cause: Corrupted JAR file
Diagnosis
- Determine the JAR file that is supposed to contain the class (identified in step #1 above) which could not be instantiated.
- Check if the specific JAR file is corrupted. For example, if you cannot unjar the file because it is corrupted or partially uploaded. If it is corrupted, then go to Resolution.
- If the JAR file is not corrupted, then go to Cause: Missing Class File.
Resolution
- Rebuild the corrupted JAR file(s) and upload the JAR file) at the appropriate level (API proxy or environment level.
- Redeploy the API proxy.
Cause: Missing Class File
Diagnosis
- Check if the specific Java class file (identified in step #1 above) is part of the JAR file specified in >ResourceURL< or any of dependent JAR files.
- If the class file does not exist in any of the JAR files, you have determined the cause for the error. Go to Resolution.
- If the class file exists in one of the JAR files specified in the JavaCallout policy, then there must be an issue with the Java code or dependent class that's leading to this error. For help, contact Apigee Support.
Resolution
- Rebuild the JAR with the missing class file(s) and upload the JAR file at the appropriate level (API proxy or environment level).
- Redeploy the API Proxy.
Upload the JAR file
Ensure that the resource element with all the necessary classes exist at the API Proxy or environment level. For more information, see Resource files.
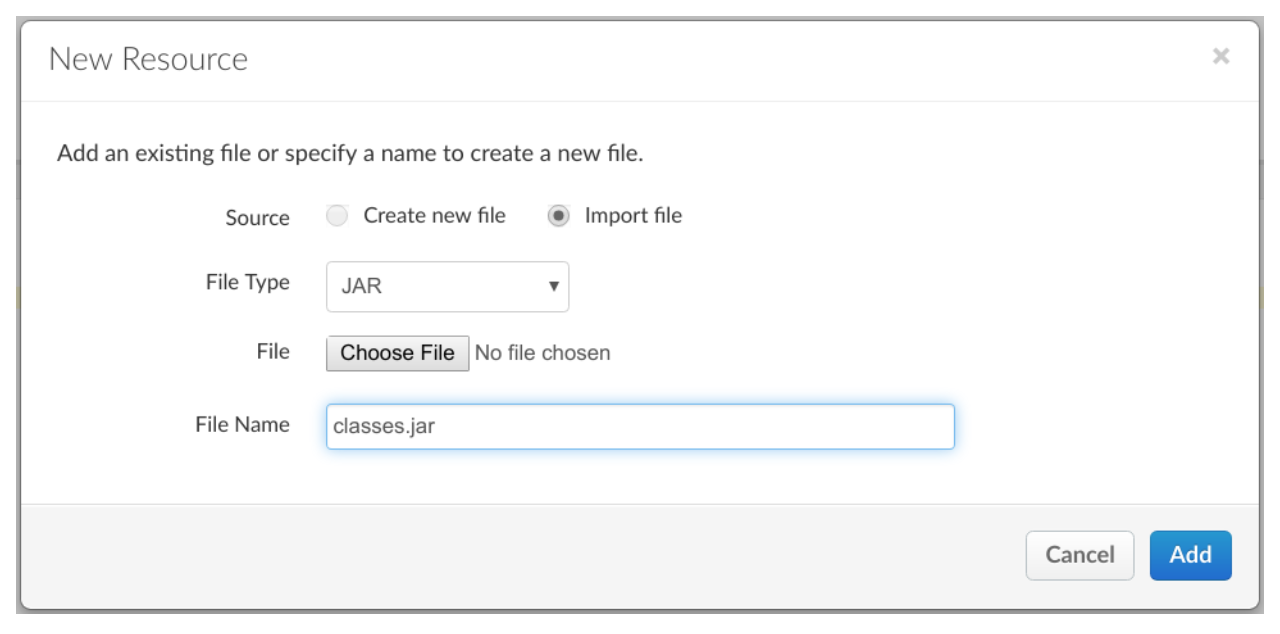
To upload a resource at the API proxy level, click + (plus sign) on the Resources tab, then select Import file and upload file from your local machine. The filename should match the >ResourceURL< element, but without the
java://prefix.
If you want a resource to be available for more than one API proxy in the same environment, upload the resource to the environment. You'll need to use the Apigee API, as described in Resource files.
For example, enter the following API call from the local machine to upload the specified file at the environment level:
curl -H "Content-Type: application/octet-stream" \
-X POST  -H "Authorization: Bearer $TOKEN" --data-binary @{classes.jar} \
"https://apigee.googleapis.com/v1/organizations/$ORG/environments/$ENV/resourcefiles?name=myresouce.jar&type=java"
Where
$TOKENis set to your OAuth 2.0 access token, as described in Obtaining an OAuth 2.0 access token. For information about thecurloptions used in this example, see Using curl.Issue the API call from the same directory as the file.
To make file available for all API proxies within all environments in the organization you can omit the environment details in the basepath. For example:
curl -H "Content-Type: application/octet-stream" \
-X POST  -H "Authorization: Bearer $TOKEN" --data-binary @{classes.jar} \
"https://apigee.googleapis.com/v1/organizations/$ORG/resourcefiles?name=myresouce.jar&type=java"
Where
$TOKENis set to your OAuth 2.0 access token, as described in Obtaining an OAuth 2.0 access token. For information about thecurloptions used in this example, see Using curl.
