This guide explains how to send rich content to Dialogflow Messenger.
Step 1: create an addRichContent tool in your agent
Create a function tool called addRichContent with the following data:
Tool input:
properties: {}
type: object
Tool output:
properties:
  status:
    type: string
  reason:
    type: string
type: object
Step 2: tell your agent how to use this tool
Tell your agent how to use the tool in instructions and examples.
For instance, add something like the following to your instructions:
-  Greet  the  user
-  Ask  the  user  what  their  favorite  color  is.
   At  the  same  time  run  ${TOOL:  addRichContent}  to  display  buttons
   for  blue,  red,  yellow,  and  green.
-  Thank  the  user
For instance, create an example like the following:
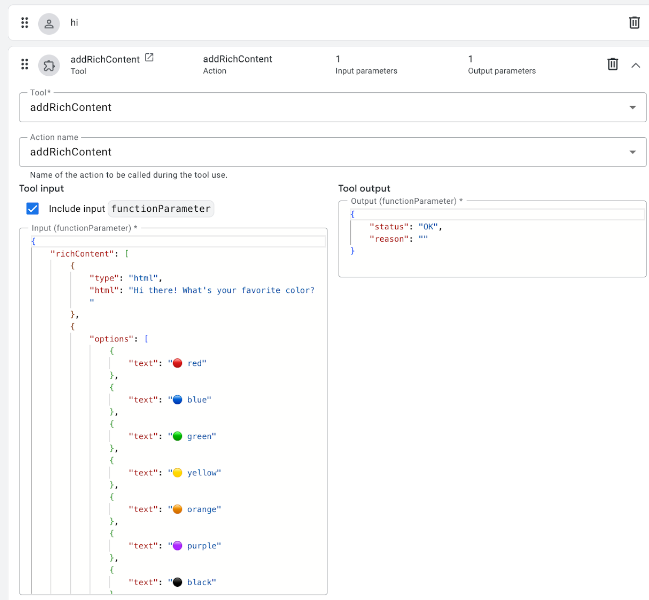
Note that the syntax for the rich content is the same you would use if you were to return a custom payload in a flow-based virtual agent.
Step 3: Define the JavaScript
In the code for the page that hosts df-messenger,
you need to create JavaScript code
that defines a function that tells df-messenger to render the rich content.
You also need to register that function with df-messenger,
so that it knows to execute the function when the virtual agent needs it.
Make sure the variable dfMessenger is declared
and points to your instance of df-messenger.
Here's some example code you can use for this purpose:
const dfMessenger = document.querySelector('df-messenger');

function  addRichContent(customPayload)  {
  dfMessenger.renderCustomCard(customPayload.richContent);

  // add error handling

  return  Promise.resolve({  status:  "OK",  reason:  null  });
}

// substitute your own tool id

const  toolId  =  'projects/PROJECT_ID/locations/LOCATION/agents/AGENT_ID/tools/TOOL_ID'
dfMessenger.registerClientSideFunction(toolId,  addRichContent.name,  addRichContent);