The Looker IDE (integrated development environment) provides access to your LookML project files and the settings for your LookML project.
Accessing the Looker IDE
To see a LookML project, you must have the develop permission for at least one model in the project. You can access the Looker IDE through the Develop panel of the Looker main navigation menu:

- Select Develop in the navigation panel to open the Develop panel.
- In the Develop panel, select the name of the project that you want to access.
Looker opens the IDE to the LookML project that you selected.
Alternatively, you can open the IDE to specific LookML objects from an Explore or from the object browser. See Accessing project files for details and other options.
Elements of the Looker IDE
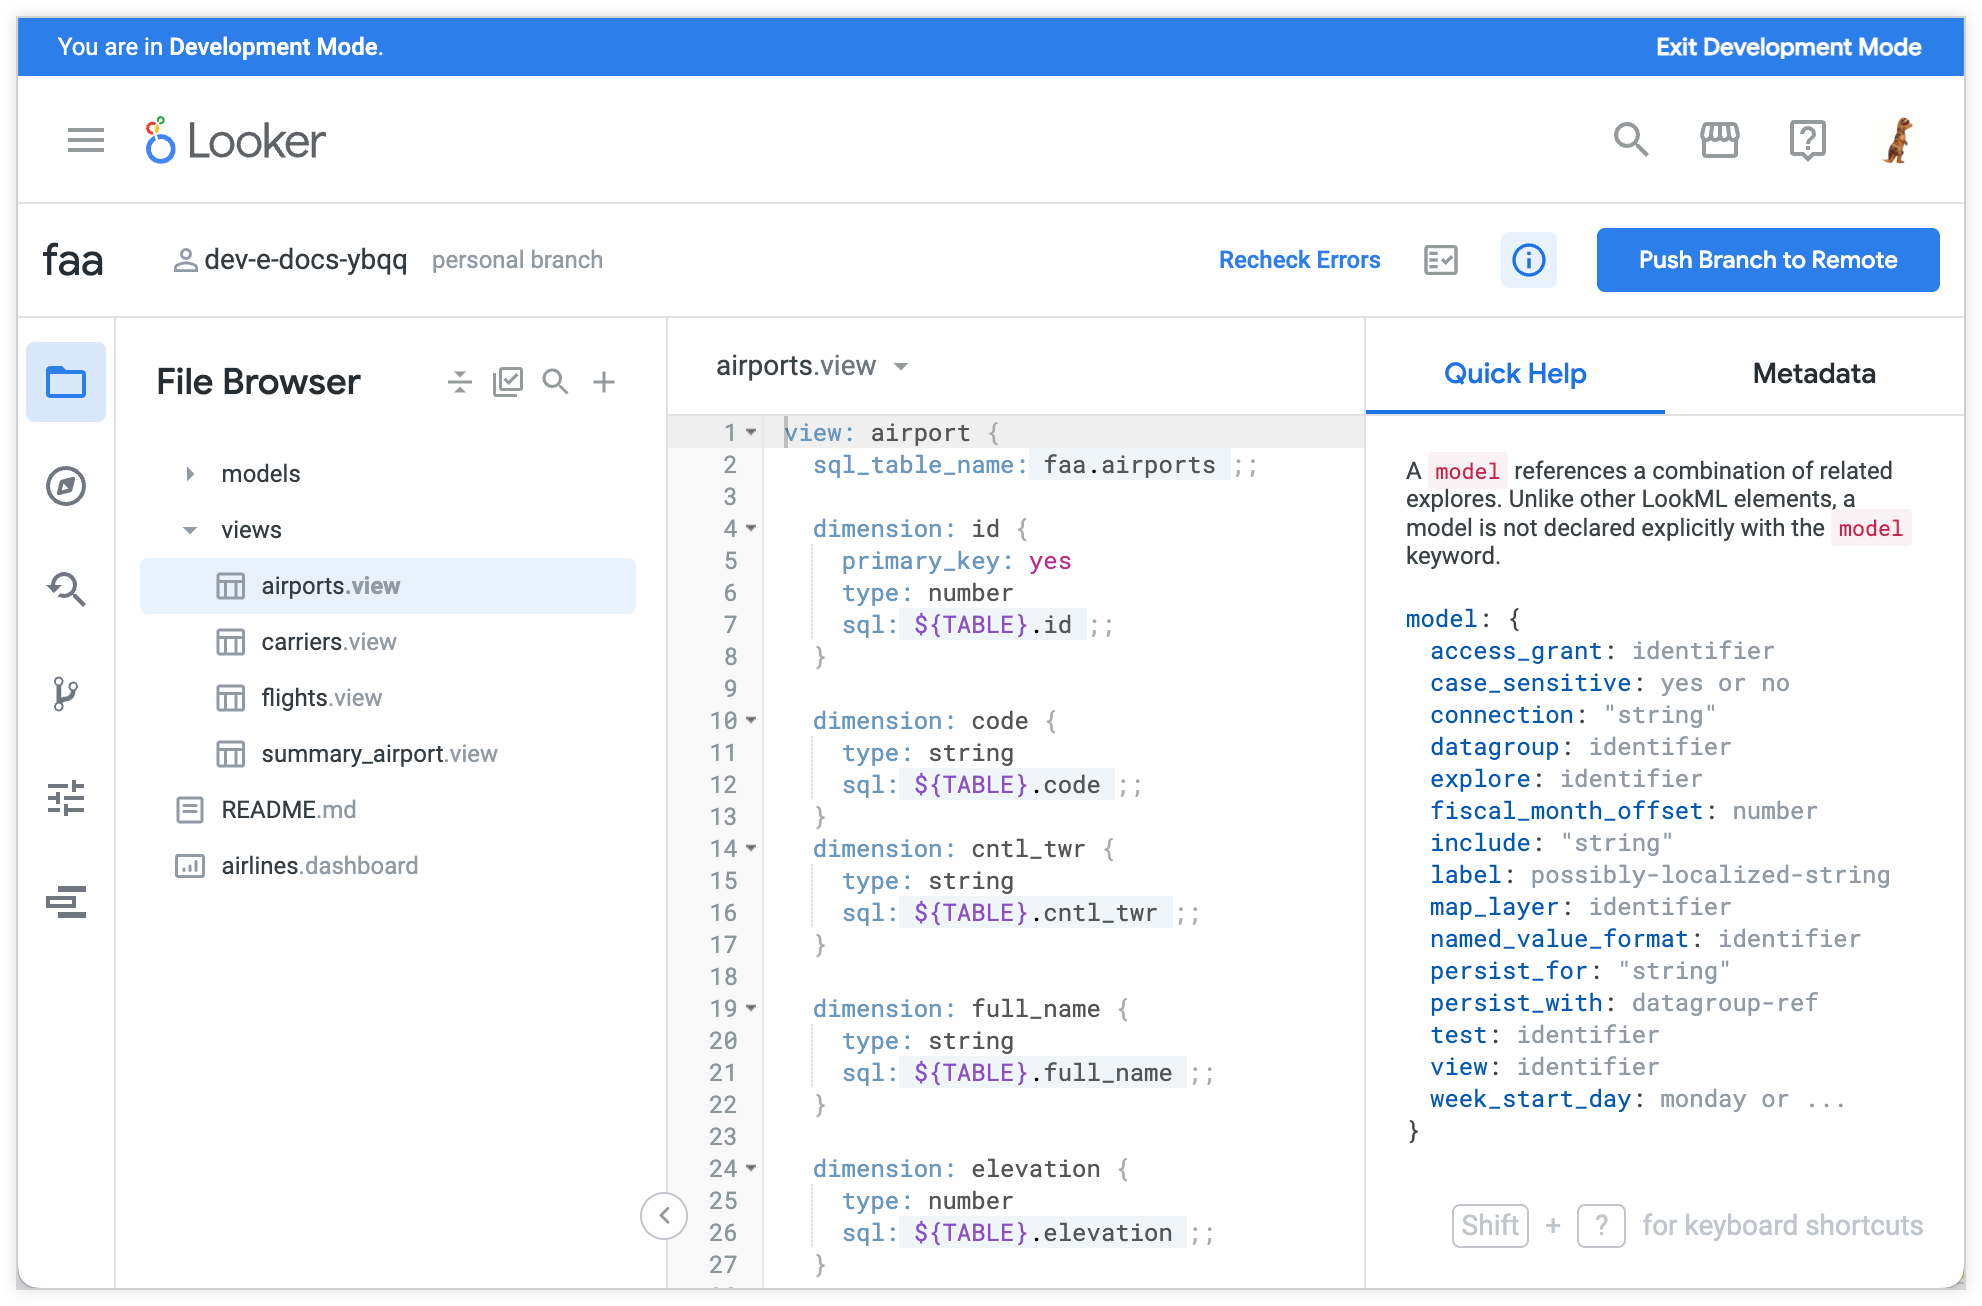
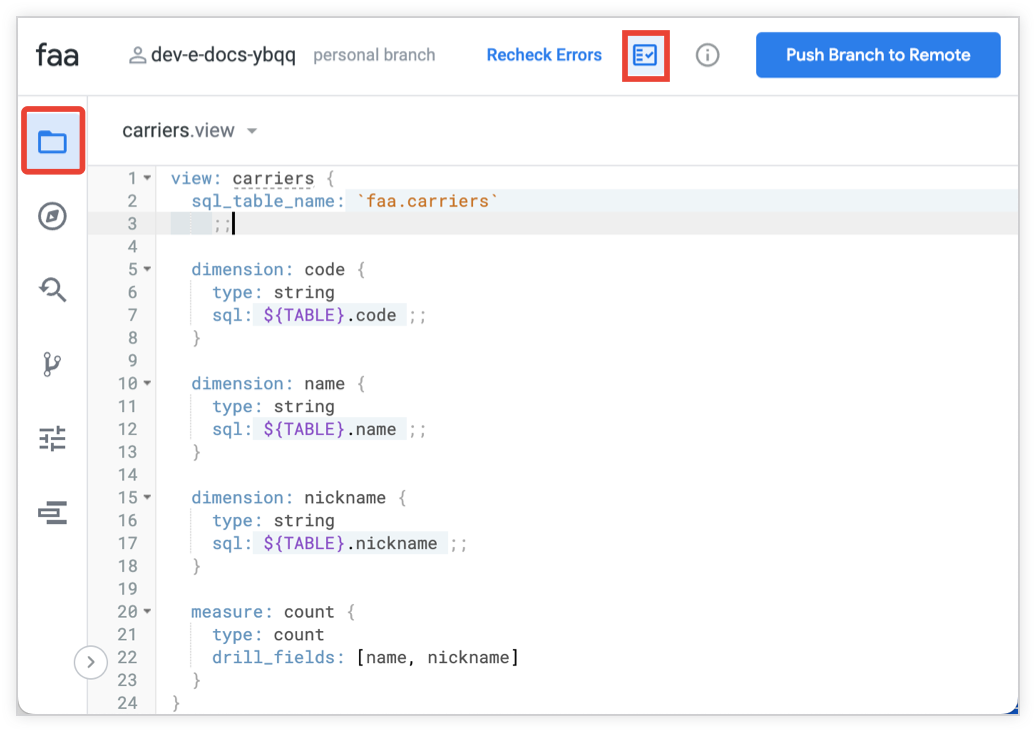
The Looker IDE has the following elements:
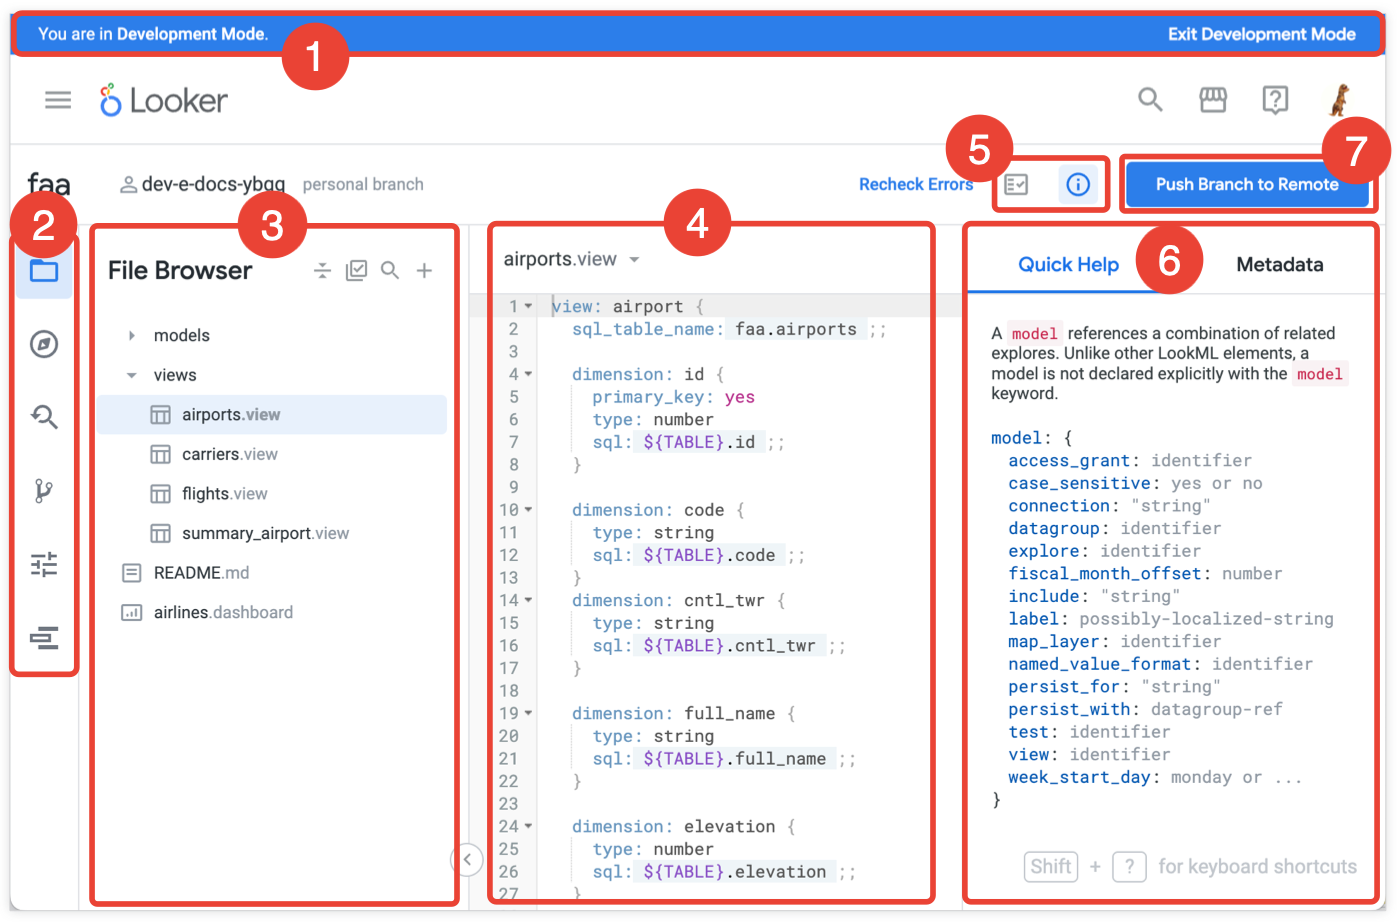
- Development Mode banner: This banner indicates that you are in Development Mode, where you can make changes to LookML files and preview how they will affect content on your instance. You can click the Exit Development Mode link in the banner to go into Production Mode.
- IDE navigation bar: Use the navigation bar to access different features of the Looker IDE. Some of the feature are available only when you are in Development Mode. Once you've selected a feature from the IDE navigation bar, you can select the navigation bar item a second time to collapse the feature panel. The IDE navigation bar provides access to the following IDE features:
- File Browser: Opens the file browser, which gives you access to the files and folders in your LookML project.
- Object Browser: Opens the object browser, which displays the LookML objects in your project and shows the hierarchical relationships between the objects.
- Find and Replace: Displays the Find & Replace in Project page, which you can use to search all your project files for text and then replace all instances or selected instances in a bulk operation.
- Git Actions: (Visible in Development Mode only) Displays the Git branches on your project and shows the Git commands that are available for your Git branch of the project. See the Using version control and deploying documentation page for information about using Git with your LookML project.
- Settings: (Visible in Development Mode only) Displays the project settings pages for your project where you can configure project version control options, authentication credentials for imported projects, Git branches used by your project, and IDE settings.
- Deploy: (Visible in Development Mode only) For projects that are set up with advanced deploy mode, opens the Deployment Manager where developers who have the
deploypermission can deploy a commit or tag to their Looker production environment.
- Feature panel: Provides navigation for LookML files and objects for the file browser and object browser, search parameters for the find and replace function, available Git commands for the Git Actions panel, and tabs to access different settings for the project settings panel.
- IDE editor panel: The editor for LookML files. The editor is displayed when File Browser or Object Browser is selected in the IDE navigation bar. See Looker IDE editing features for more information about the editor.
- Side panel selector: Click an option to open the IDE side panel features:
- Project Health: Opens the Project Health panel.
- Quick Help: Opens the Quick Help panel, which includes a tab to access the Metadata panel.
- Help me code: (For Looker (Google Cloud core) instances with Gemini enabled) Opens the Help me code panel. Click the side panel selector option a second time to hide the IDE side panel.
- IDE side panel: Displays the selected side panel feature:
- Project Health: Lets you check for unbuilt PDTs or validate your LookML. If your LookML developers have defined data tests to verify the logic of the project's LookML, you can also run data tests from the Project Health panel.
- Quick Help: Displays the LookML options that apply to the cursor's location in a LookML file and provides a link to the Looker reference documentation for each LookML parameter.
- Metadata: Provides contextually relevant information about the LookML object at the cursor's location.
- Help me code: (For Looker (Google Cloud core) instances with Gemini enabled): Lets you use Gemini in Looker to help write LookML.
- Git button: Depending on the state of your project, the button shows the next action that you should take to get your project to production, such as Validate LookML, Push Branch to Remote, or Commit. Click the button to perform the action. See the Git command reference for the possible commands that the button can display and execute.
Setting up the Looker IDE
You can customize the Looker IDE in the following ways:
- Select the text editor mode
- Enable or disable the line wrap mode
- Resize the IDE side panels
- Collapse the IDE side panels to maximize the width of the editor in the window
Text editor modes
The Looker IDE supports three text editor modes:
To change the text editor mode, follow these steps:
- Select the Settings icon from the left navigation pane in the Looker IDE.
- Select the Editor tab from the IDE Settings.
- Use the Text Editor Mode pull-down menu to select your option.
Once you select an option from the pull-down menu, the Looker IDE is immediately updated to use the selected text editor mode.
Line wrap mode
By default, the Looker IDE is enabled for line wrapping.
To enable or disable line wrapping:
- Select the Settings icon from the left navigation pane in the Looker IDE.
- Select the Editor tab from the IDE Settings.
- Use the Line wrap mode toggle to enable or disable line wrapping in the IDE.
Once you change the toggle, the update is applied to the Looker IDE.
Resizing the IDE side panels
You can change the width of the panels in the IDE, both the feature panel (which contains the File Browser, Object Browser, and Git Actions panels) and the side panel (which contains the Project Health, Quick Help, and Metadata panels).
To resize the IDE panels, hold your cursor over the panel border, then drag to resize the panel:
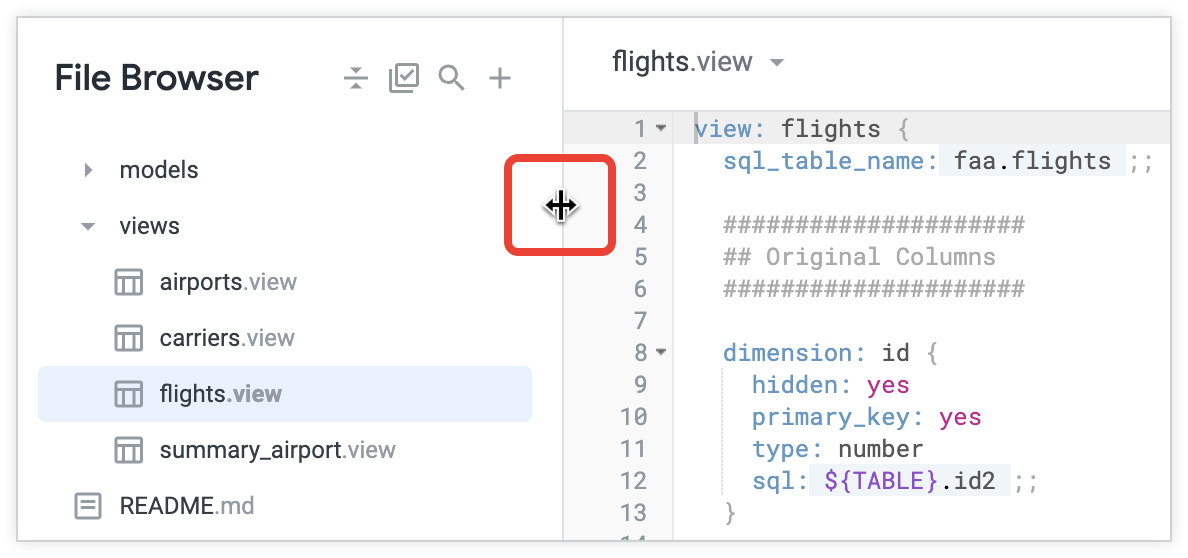
If you are in Development Mode, the IDE will persist the size of the side panels across logins and refreshes.
Collapsing the IDE side panels
If you want to maximize the width of the IDE editor panel, you can collapse the IDE side panels:
- To show or hide the IDE feature panel, either use the keyboard shortcut Command-B (Mac) or Ctrl+B (Windows), or click an icon in the IDE navigation bar that is already selected.
- To show or hide the IDE side panel, click an icon in the side panel selector that is already selected.
Looker IDE editing features
The following sections describe some of the Looker IDE editing features that can help you develop in LookML:
- Autosuggest
- Ad hoc error checking
- Automatic formatting
- Folding
- Commenting
- Seeing additions, changes, and deletions
- IDE state persistence
- Jump to object or file
Autosuggest
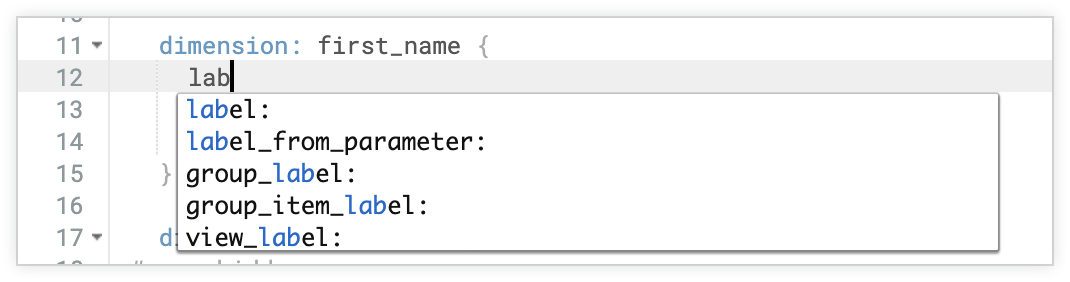
As you type, the IDE suggests possible parameters and values that are sensitive to the context of what you are typing. For example, the suggestions for a dimension's type parameter will only include valid options for that parameter. Also, fields in sql parameters have to be marked with ${...}, so the IDE adds that syntax when suggesting fields.
Autosuggest automatically appears wherever it can be shown. To close it, press the Esc key on your keyboard. To view it at any point, press Ctrl+Space (Windows) or Control-Space (Mac).
Ad hoc error checking
The IDE catches syntax errors as you type. A red X in the gutter indicates a syntax error, which is underlined in red. When you hold the cursor over the red X, a short description of the problem appears. For example, if you mistakenly type avrage instead of average as the value of the type parameter for a measure, the IDE displays the error Invalid value for "type":avrage.

The LookML Validator is still required to perform a full model validation. Some errors, such as an invalid field reference that is caused by a missing join, require a holistic look at the model and therefore are only surfaced when the LookML Validator is run.
Automatic formatting
When you are in Development Mode, you can use the format file keyboard shortcut to automatically indent your LookML file. The indentation indicates the hierarchy of parameters and subparameters, making your LookML easier to read and understand.
Folding
A small arrow appears in the gutter next to the start of each top-level LookML parameter in the file. Selecting this arrow folds or unfolds that section of LookML so that you can focus on just particular sections.

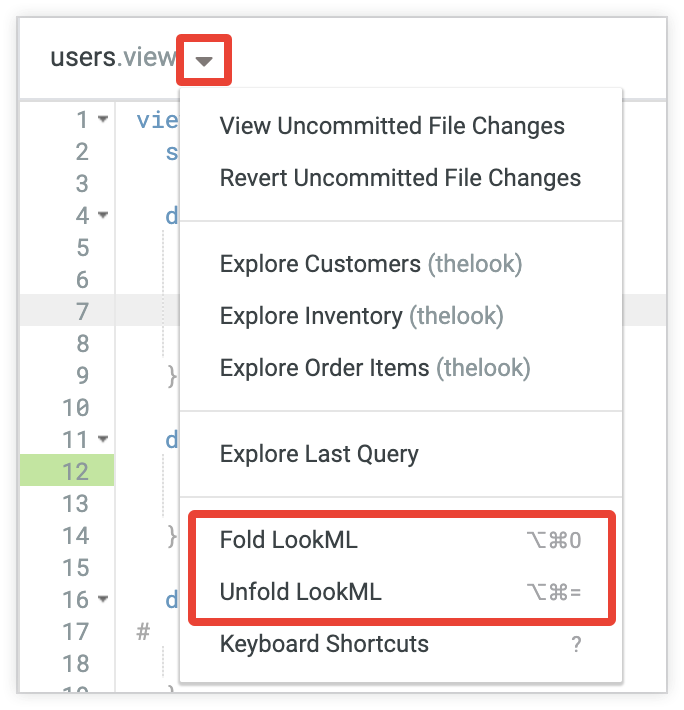
The See file actions menu for the LookML file also provides Fold LookML and Unfold LookML options to expand or collapse all LookML sections down to the top-level parameter within the current file.
You can also use keyboard shortcuts to fold and unfold LookML.
Commenting
You can add comments to your LookML to make it more readable. To add a single comment, use the # character:
dimension: name {
  sql: ${TABLE}.name ;; # This is the customer's full name
}
You can comment out an entire block of code using keyboard shortcuts by performing these steps:
- Select the lines that you want to comment out.
- Press Command + / (Mac) or Ctrl + / (Windows).
The IDE will add the # character to each of your selected lines.
Commenting out SQL blocks
If you are commenting out lines that are entirely within a SQL code block, manually add SQL comment notation.
When you use the SQL comment block, the commented-out sections will still be interpreted as LookML code. Therefore, you will see your comments within LookML-generated SQL, but the comments won't affect the query results.
Seeing additions, changes, and deletions
In the LookML IDE, several indicators are always displayed when you are in Development Mode and have uncommitted changes.
- The file's name is displayed with a blue dot in the left side of the window to indicate that the file is new, changed, or renamed.
- When you open a new or changed file, the line numbers inside the file are highlighted in green to show new or changed lines, and a horizontal red line indicates removed lines.
IDE state persistence
When you are in Development Mode, the Looker IDE persists your IDE state across refreshes and logins. Your IDE state includes the following:
- The selected item in the IDE navigation bar (such as the file browser, Git actions, object browser, or project settings)
- Open LookML file that is displayed in the file browser
- Expanded or collapsed state of items in the file browser and object browser
- The width of the IDE side panels
- The selected item in the IDE's right sidebar (such as the Quick Help panel, the Metadata panel, and the Project Health panel)
- The line wrap mode of the editor
To reset the IDE to its defaults, select the Settings icon from the left navigation pane in the Looker IDE, select the Editor tab from the IDE Settings section, and then click the Reset IDE Layout button. The IDE will persist your state again as you continue to open files and make selections.
Jump to object or file
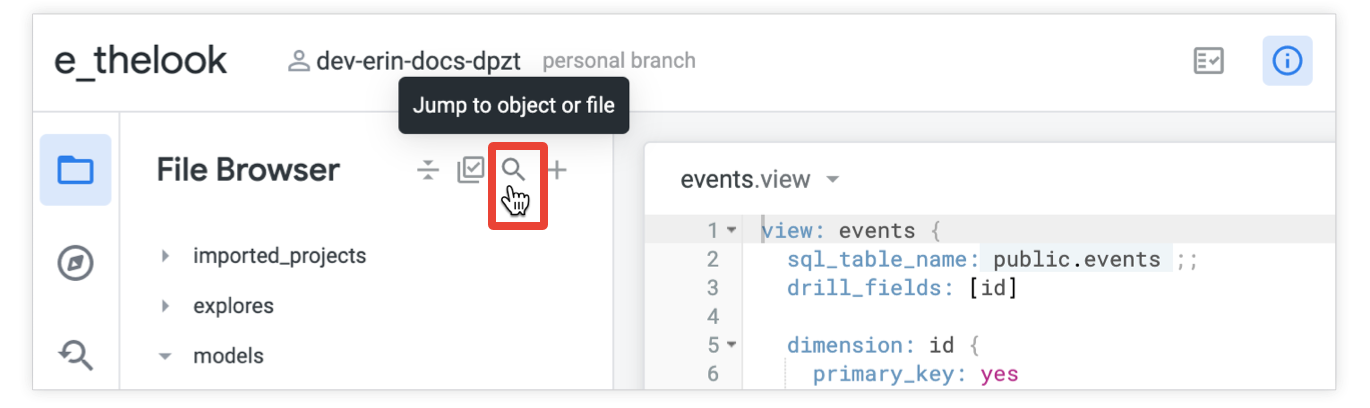
In the Looker IDE, you can do a quick search to navigate directly to LookML objects and project files by using the Jump to object or file feature. Click the Jump to object or file icon from the file browser or the object browser, or use the keyboard shortcut Command-J (Mac) or Ctrl+J (Windows).
See the Accessing LookML project files documentation page for more information.
Quick Help panel
To open the Quick Help panel, select the Quick Help icon from the file browser or the object browser:

The Quick Help panel provides explanations and options for the current location in the code:
- In the IDE editor panel, you can click the fields and parameters in your LookML files, and the Quick Help panel will display the supported options and subparameters for that LookML element.
- In the Quick Help panel, you can click a parameter name to open the Looker documentation page for that parameter.
Help me code panel
If you have a Looker (Google Cloud core) instance with Gemini enabled, you can use Gemini in Looker to help write LookML:
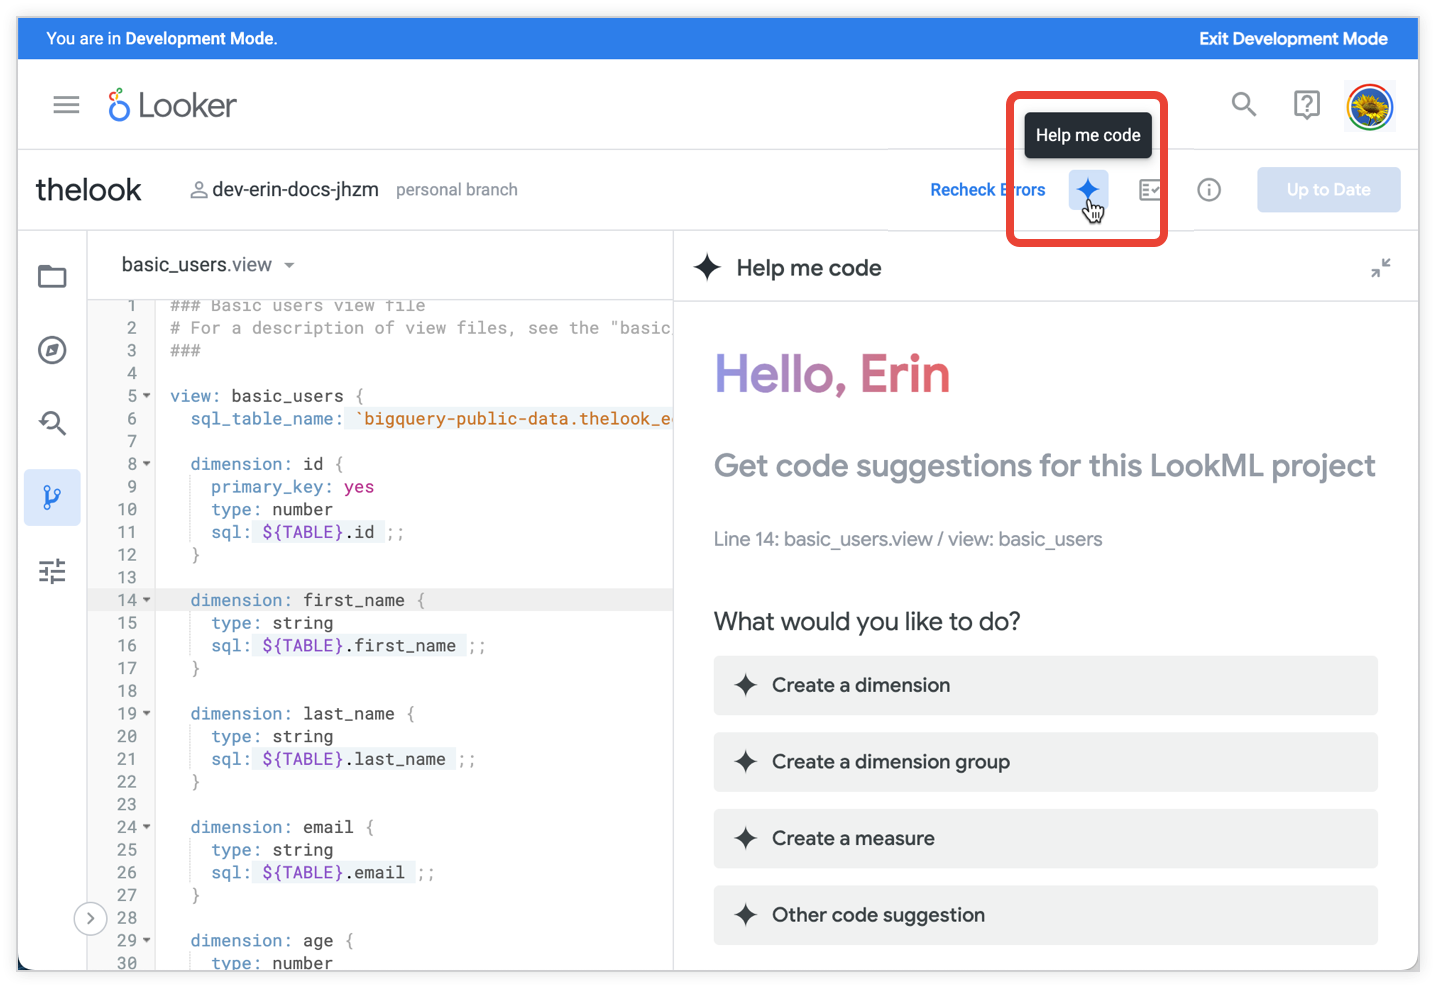
See the Write LookML with Gemini in Looker assistance documentation for details.
Options menus for files and folders
In the file browser, each file or folder in the left side panel has a menu that displays the available actions for that item. Hold the cursor over a file and folder, and then select the three-dot Folder Options menu (for folders) or File Options menu (for files) to open the menu. For an item that has a long name or that is nested in multiple folders, you can access the menu by scrolling sideways in the file browser panel.
From the options menus, you can create folders and files, upload files, and delete and move files and folders using the file browser. For more information, see the Managing LookML files and folders documentation page.
As you organize your LookML files with folders, you need to commit your changes and deploy them to production before other Looker developers can see them. This is just like any change you make to your LookML project.
Finding and replacing text in your project
The Looker IDE has a find and replace function, which you can use to search all your project files for text and then replace all instances or selected instances in a bulk operation.
To use the Looker IDE find function, follow these steps:
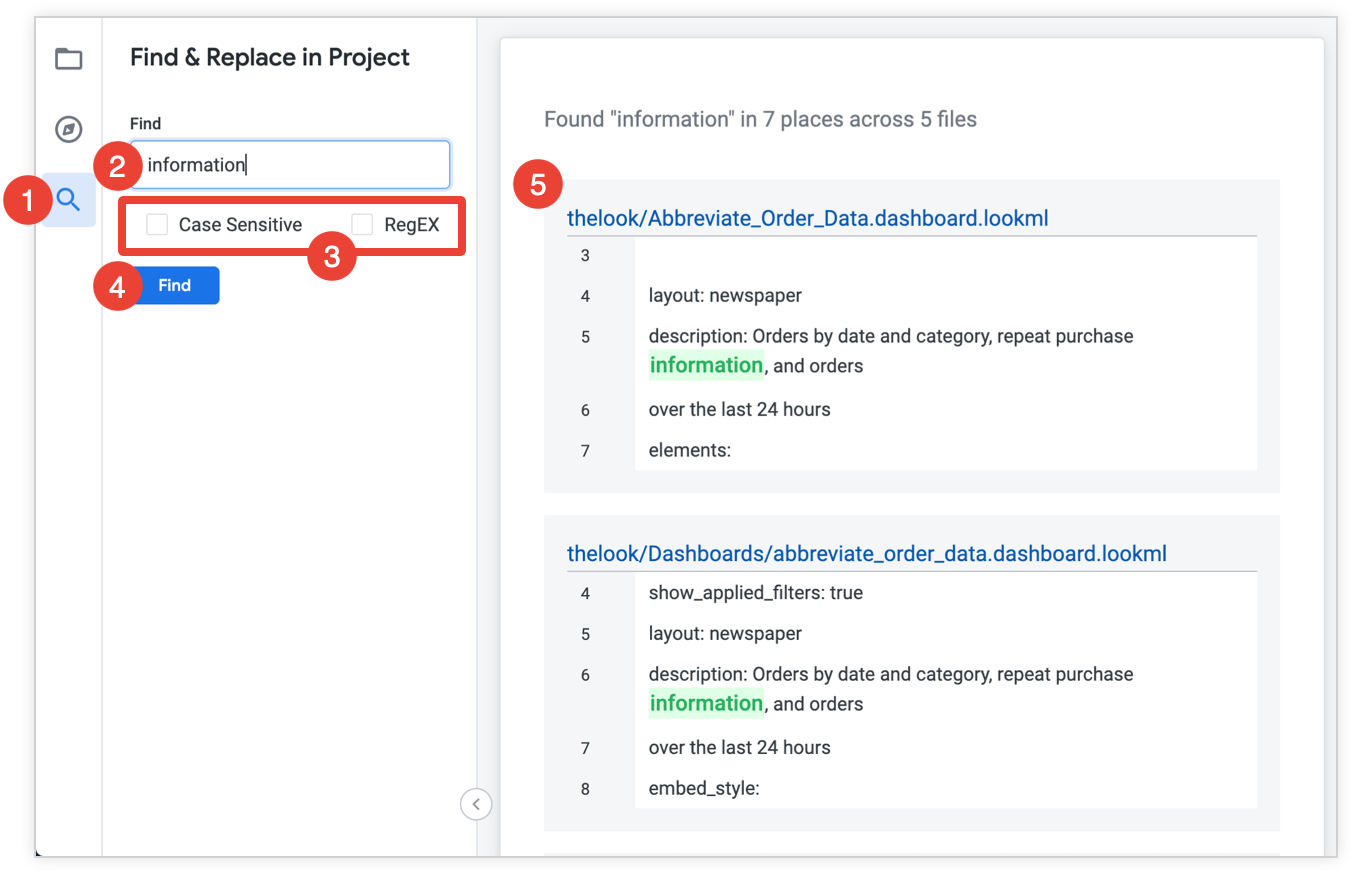
- Navigate to the search panel in the IDE.
- Enter a term in the Find field.
- Optionally, you can select Case Sensitive to search only for instances that match the case you entered in the Find field, or you can select RegEX to perform a regular expression search.
- Select Find.
- Optionally, you can select a file's name to open that file in the IDE.
If you are in Development Mode, you will also see the Replace With field. To replace text in your project, follow these steps:
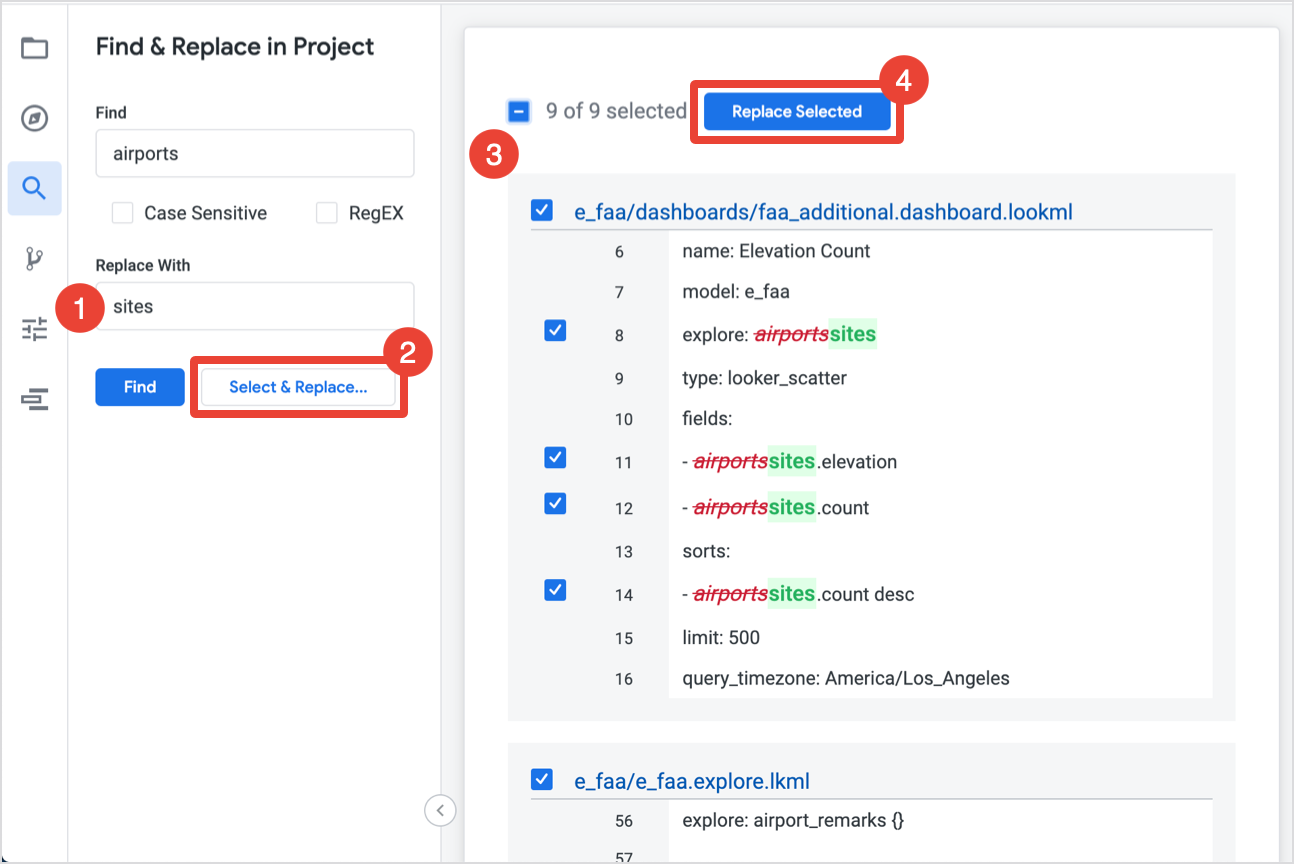
Enter replacement text in the Replace With field. Optionally, you can leave the Replace With field blank if you want to delete the text in the Find field instead of replacing it.
Select Select & Replace to preview how your text would be replaced in your project.
The results show all instances in your project highlighted for replacement. You can use the following options to customize which instances are replaced:
- Use the checkbox next to the results summary to select or deselect all instances across your entire project.
- Use the checkbox next to a single instance to select or deselect that instance.
Select the Replace Selected button to apply the replacement to the instances you've selected. The IDE will show the changes that were made.

Creating and testing new fields
As an example of editing LookML, we'll add several fields and then test them.
Creating a dimension
First we will add a new dimension to our users view that determines if a user is from either California or New York. The dimension will be type: yesno, which means it will return Yes if the user is from California or New York, and No if not.
The LookML for our new dimension looks like:
dimension: from_ca_or_ny {
  type: yesno
  sql: ${TABLE}.state = "California" OR ${TABLE}.state = "New York" ;;
}
Add this dimension to the user view file, and then click the Save Changes button in the file.
Check out substitution operators to learn more about ${TABLE}.state.
Creating a measure
Next we will add a new measure to our user view that averages the age of our users. This measure will be type: average and aggregate over the column age.
The LookML for this new measure looks like:
measure: average_age {
  type: average
  sql: ${TABLE}.age ;;
}
Add this measure to the user view file, and then click the Save Changes button in the file.
Testing the fields in the Explore
You can test your new dimension and measure by querying them. After you save your changes, these fields will appear in the field picker in the Explore. Use the See file actions drop-down menu next to the view filename to access the Explore for the current view. The See file actions drop-down menu lists any Explores that are based on the view, including Explores that the view is joined to. As an example, to access the Explore for a view called users, you can select the Explore Users option from the See file actions drop-down menu.

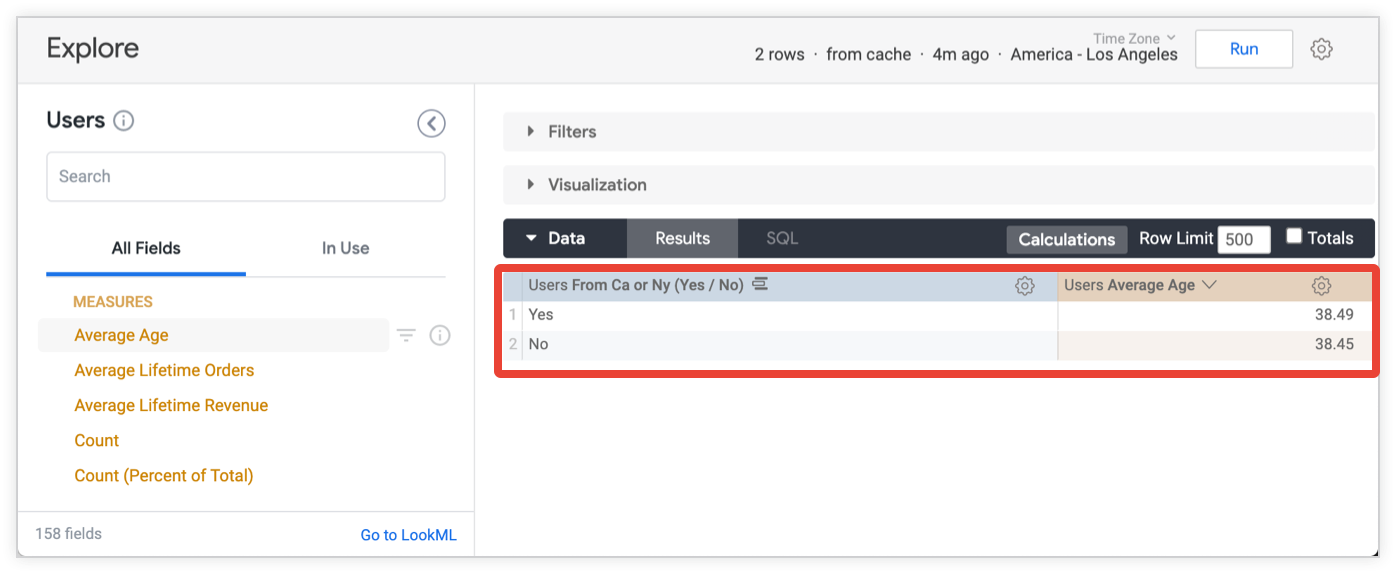
In the Users Explore, you can select the new fields to add them to a query. For example, you can create a query with both of the new fields that shows the average age of users who are from California or New York and the average age of users who are not: