See the supported connectors for Application Integration.
Retrieve API payload and send an email
Learn how to create a sample integration in Application Integration. The following steps describe how to configure the trigger, tasks, edges, variables, and data mappings required to run a complete integration.
Overview
In this quickstart, you will retrieve the number of page views from a public API, transform the data into a usable format, and send the resulting list in an email, all from within the integration editor.
To follow step-by-step guidance for this task directly in the Google Cloud console, click Guide me:
Create a new integration
To create a new integration, perform the following steps:
- In the Google Cloud console, go to the Application Integration page.
- In the navigation menu, click Integrations. The Integrations page appears.
- Click Create Integration.
- Enter a name and description in the Create Integration dialog.
For this quickstart, enter the name
my-test-integrationand the descriptionIntegration for quickstart. - Select a region for the integration.
- Click Create to open the integration editor.
Add and configure an API trigger
Triggers are required to start the sequence of tasks that make up an integration. Any available trigger can be used to start an integration. For this quickstart, use the API trigger.
To configure the API trigger, do the following:
- In the integration editor, click Triggers to display a list of available triggers.
- Click API trigger in the integration editor.
- To configure the trigeer, click API trigger. The trigger configuration pane appears.
- Application Integration automatically populates the trigger Label and Trigger ID. The Trigger ID
is machine-generated and you cannot edit the value. However, you can edit the value of
the Label property.
Changes to the properties are saved automatically.
Add and configure tasks
A task is an executable set of steps that can take variables as inputs and generate variables as outputs. As with triggers, any available task can be used in an integration. This quickstart uses the Call REST Endpoint, Data Mapping, and Send Email tasks. Configuration details for each task are described in the steps below.
Configure the Call REST Endpoint task
To configure the Call REST Endpoint task, do the following:
- Select Tasks to display a list of available tasks.
- Click and place Call REST Endpoint in the integration editor.
-
Add an edge connection from API trigger to
Call REST Endpoint by hovering over a control point on API trigger, then
clicking and dragging a line to a control point on the Call REST Endpoint task. The edge denotes the flow of control from the API trigger to the Call REST Endpoint task.
An edge is a connection between any two elements in an integration. The connection denotes the direction of the control flow from one element (task or trigger) to another. For more information about edges, see Edges.
- To configure the task, click Call REST Endpoint. The task
configuration pane appears. Set the following properties:
- Label: Enter a custom name for this task. For example, enter
Call REST
        Endpoint Task
. - Authentication: For this quickstart, an authentication profile is not required. For more information on using authentication profiles for other use cases, see Create authentication profiles in Application Integration.
- Task Input: Enter the details for calling the REST endpoint. The information
entered here is used as input for the Call REST Endpoint task. The following diagram shows the Task Input and HTTP settings sections for the Call REST Endpoint task:
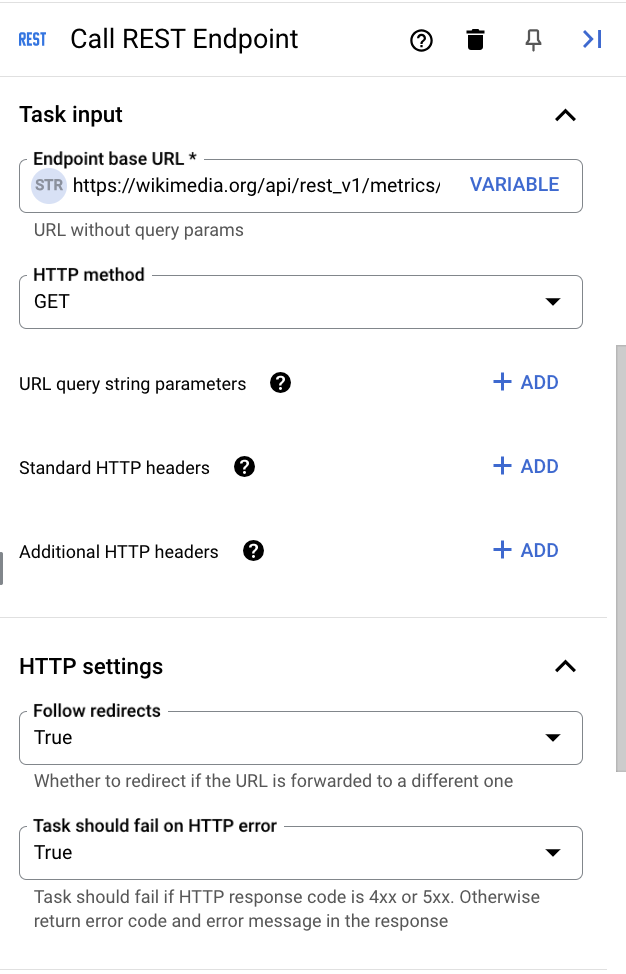
Enter the following information:
- Endpoint base URL: Enter
https://wikimedia.org/api/rest_v1/metrics/pageviews/per-article/en.wikipedia/desktop/user/Tree/monthly/20201001/20201031. This public API from wikimedia.org returns the number of page views for an article named Tree for a given month. - HTTP method: Select
GETusing the dropdown list.
- Endpoint base URL: Enter
- HTTP settings: Application Integration populates the following values:
- Follow redirects:
True - Task should fail on HTTP Error:
True
- Follow redirects:
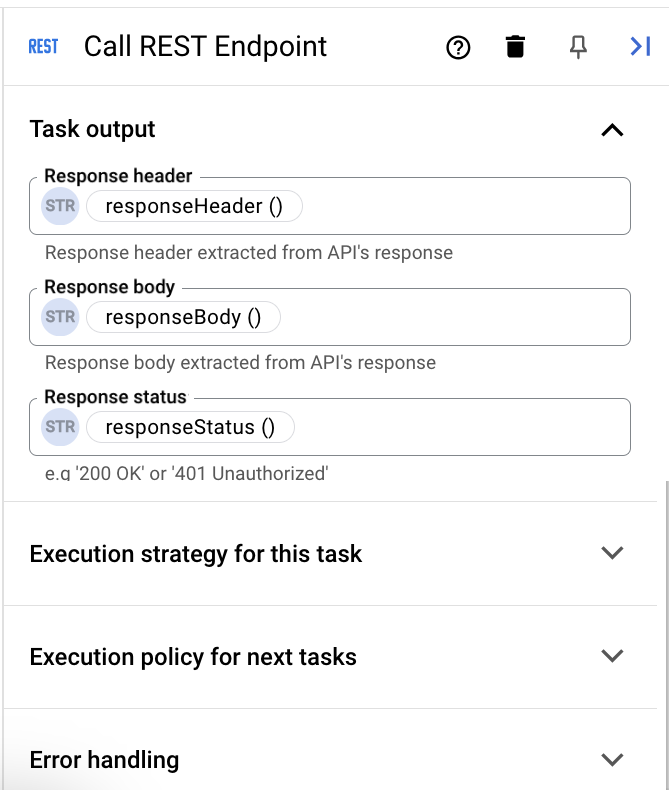
- Task Output: Application Integration populates three
variables to hold the response data output of calling the REST endpoint. The following diagram shows the Task Output and other sections for the Call REST Endpoint task:
Review the following information:
- responseHeader(Call REST Endpoint): This variable holds the response header
data associated with the Call REST Endpoint task. The variable data
is of type
String(STR). - responseBody(Call REST Endpoint): This variable holds the response body
data associated with the Call REST Endpoint task. The variable data
is of type
String(STR). - responseStatus(Call REST Endpoint): This variable holds the response status
data associated with the Call REST Endpoint task. The variable data
is of type
String(STR).
- responseHeader(Call REST Endpoint): This variable holds the response header
data associated with the Call REST Endpoint task. The variable data
is of type
- The remaining fields should contain the following default values:
- Execution strategy for this task:
When all tasks succeed - Execution policy for next task:
Run all match
- Execution strategy for this task:
Changes to the properties are saved automatically.
- Label: Enter a custom name for this task. For example, enter
Add and configure the Data Mapping task
To configure the Data Mapping task:
- Select Tasks to display a list of available tasks.
- Click and place Data Mapping in the integration editor.
- Add an edge connection from Call REST Endpoint to Data Mapping by hovering over a control point on Call REST Endpoint, then clicking and dragging a line to a control point on the Data Mapping task. The edge denotes the flow of control from the Call REST Endpoint task to the Data Mapping task.
- To configure the task, click the Data Mapping task. The configuration pane of the task appears.
- Click Open Data Mapping Editor.
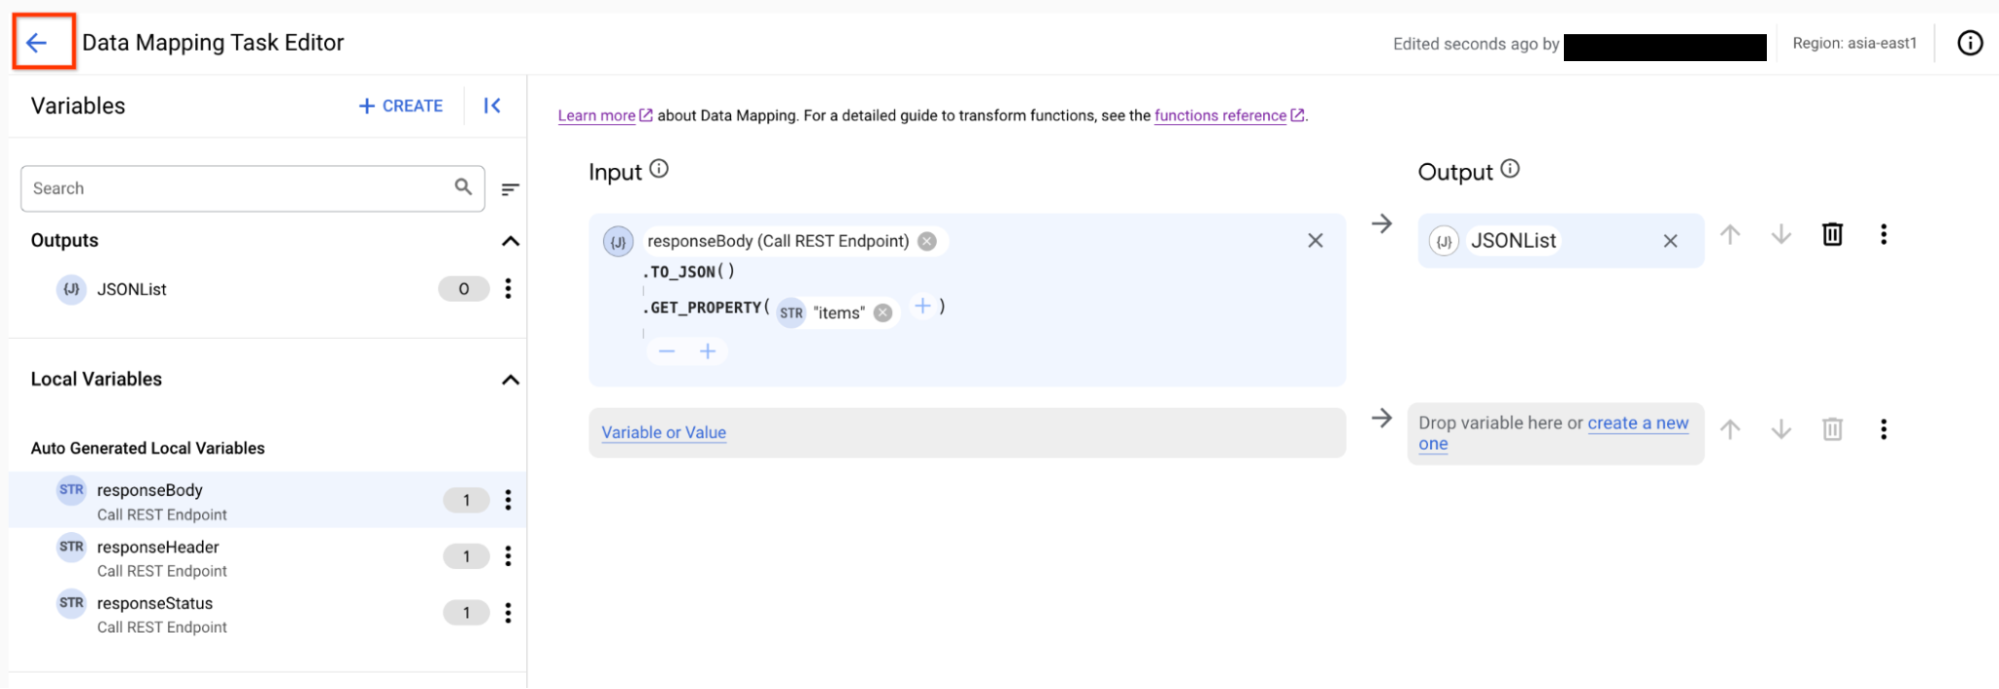
The Data Mapping Editor lets you to map input variables to the desired output variables, using the available transformation functions. The output is then available as a variable to any other integration task or trigger. For more details on passing data as variables, see Variables.
For this quickstart, create a mapping using the responseBody(Call REST Endpoint) as input:
- Drag the responseBody variable from the Variables pane to the first Input row.
- Click + (Add a function) in the responseBody variable chip to view the list of available functions. You can apply a number of functions to transform the data in the input variable.
In this case, you can convert the payload to JSON and then iterate over the response array to get the list of product names required for your email notifications. To do so, follow these steps:
- Select
TO_JSON()to convert the responseBody string to JSON. - Click + (Add a function) in the responseBody variable chip to select and
chain the
GET_PROPERTY()function. - To add the input parameter for
GET_PROPERTY(), click Variable or Value and in Value enteritems.This function will extract a property from the JSON payload. Pass in the
itemsproperty as the parameter for this function. This will return a list of ONLY the product names, with no other product information. Your function should read as follows:responseBody(Call REST Endpoint).TO_JSON().GET_PROPERTY(items)
- If you need to remove or delete a function, click the - symbol.
- Select
- Click the first field in the Output column to create a new output variable to hold the value of the transformed
data. Complete the following fields:
- In the Name field, enter
JSONList. - From the Variable Type list, select Output from integration.
- From the Data Type list, select JSON
- To create the variable and close the pane, click Create. The new JSONList variable will appear in the Variables list on the left side of the Data Mapping editor.
- In the Name field, enter
- Close the Data Mapping Editor after your mapping is complete. Any changes will be autosaved. The following images shows the Data Mapping Editor with the mapping created in this quickstart:
Add and configure the Send Email task
To configure the Send Email task:
- Select Tasks in the integration editor to display the list of available tasks.
- Click and place Send Email in the integration editor.
- Add an edge connection from Data Mapping to Send Email by hovering over a control point on Data Mapping, then clicking and dragging a line to a control point on the Send Email task. The edge denotes the flow of control from the Data Mapping task to the Send Email task.
- To configure the task, click Send Email. The configuration pane
of the task appears. In the Task Input section, set the following properties:
- To Recipient(s): Enter your email address. You will use this email to confirm the successful completion of the integration.
- Subject: Enter
Email from Application Integration. - Body in Plain Text: Select the
JSONListvariable created earlier in the Data Mapping task. - The remaining options can be left in the default configuration.
Changes to the properties are saved automatically.
Verify the required edge connections
Verify that you've added edge connection between task and triggers in your integration. The connection denotes the direction of the control flow from one element (task or trigger) to another. For more information about edges, see Edges.
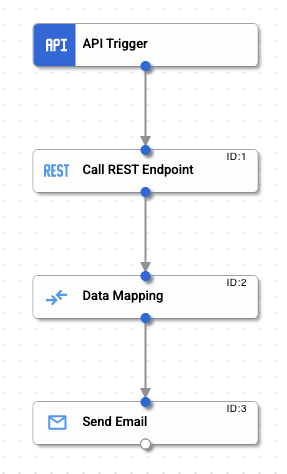
The completed connection should appear as shown in the figure below:
Test the integration
To test the new integration:
- Click Test in the integration editor toolbar.
The Test Integration pane appears.
- Click Test integration.
For more information about testing, see Test and publish integrations.
Upon successful completion, the integration sends an email with the JSON values to the email address specified in the Send Email task. Confirm receipt of the email in your email client.
The email sent by the integration should contain a body similar to the following:
[{
   "project": "en.wikipedia",
   "article": "Tree",
   "granularity": "monthly",
   "timestamp": "2020100100",
   "access": "desktop",
   "agent": "user",
   "views": 33828.0
}]
In addition to verifying the contents of the email, you can inspect the logs to view the status and payload of a given integration. To view logs:
- Click Logs in the toolbar of the integration editor.
- On the Execution Logs page, you can view details about each attempt to run an integration.
Each entry includes details for the execution attempt, including:
- Integration name
- Execution ID
- Status
- Start time
- Duration
- Integration Version
- Trigger ID
- Cloud Logging
- Click the expander arrow (>) next to the executed integration to view an expanded list of tasks and variables in the integration, along with task status and variable payloads.
Quotas and limits
For information about quotas and limits, see Quotas and limits.