Create a CA pool
This page describes how to create certificate authority (CA) pools.
A CA pool is a collection of multiple CAs with a common certificate issuance policy and Identity and Access Management (IAM) policy. A CA pool makes CA rotation management easier and lets you achieve higher total effective queries per second (QPS).
You must create a CA pool before you can use Certificate Authority Service to create a CA. For more information, see Overview of CA pools.
Before you begin
Make sure you have the CA Service Operation Manager
(roles/privateca.caManager) IAM role. For information about
granting an IAM to a principal, see Grant a single
role.
Decide the CA pool's settings
This section describes the settings of a CA pool and provides recommendations for deciding the settings.
Permanent CA pool settings
The following CA pool settings can't be changed after creating the CA pool.
- Location
- Specify the CA pool's location. A CA pool is stored in a single Google Cloud location. We recommend that you create your CA pool in the same location or near the location where you intend to use it.
- For the complete list of supported locations, see Locations.
- Tier
- Choose whether you want to create the CA pool with the DevOps or the Enterprise tier. This choice affects whether CA Service persists the created certificates, whether created certificates can later be revoked, and the maximum rate at which you can create certificates from the CAs in the CA pool. For more information, see Select the operation tiers.
Optional CA pool settings
- Certificate issuance policy
A CA pool can have a certificate issuance policy. This issuance policy places restrictions on the certificates that the CAs in the CA pool are allowed to issue. You can update the issuance policy of a CA pool after you create the CA pool. For more information, see Overview of templates and issuance policies.
For more information about configuring a certificate issuance policy, see Add a certificate issuance policy to a CA pool.
- Publishing options
You can configure a CA pool to publish the CA certificates for each of its CAs. When issuing a certificate, the URL to this CA certificate is included in the certificate as an authority information access (AIA) extension.
CAs in Enterprise tier CA pools can be permitted to publish certificate revocation lists (CRLs) to the associated Cloud Storage bucket. When issuing a certificate, a URL to this CRL is included in the certificate as the CRL Distribution Point (CDP) extension. You cannot find the CRL without the CDP extension in the certificate. For more information, see Revoke certificates.
You can also select the encoding format of published CA certificates and CRLs. The supported encoding formats are Privacy Enhanced Mail (PEM) and Distinguished Encoding Rules (DER). If an encoding format is not specified, PEM will be used.
If you create the CA pool using Google Cloud CLI or Google Cloud console, CA Service enables these publishing options by default. For more information, see Disabling CA certificate and CRL publication for CAs in a CA pool.
Create a CA pool
To create a CA pool, use the following instructions:
Console
Choose a name for the CA pool
Go to the Certificate Authority Service page in the Google Cloud console.
Click CA pool manager.
Click Create pool.
Add a name for the CA pool that is unique for the region.
Select a region from the drop-down in the Region field. For more information, see Choosing the best location.
Select either the Enterprise or the DevOps tier. For more information, see Select the operation tiers.
Click Next.
Configure allowed key algorithms and sizes
CA Service lets you choose the signing algorithms for the Cloud KMS keys that back the CAs in the CA pool. All key algorithms are allowed by default.
To restrict the allowed keys in the certificates issued by the CA pool, do the following. This is an optional procedure.
- Click the toggle.
- Click Add an item.
In the Type list, select the key type.
If you want to use RSA keys, do the following:
- Optional: Add the minimum modulus size in bits.
- Optional: Add the maximum modulus size in bits.
- Click Done.
If you want to use elliptic curve keys, do the following:
- Optional: In the Elliptic curve type list, select the elliptic curve type.
- Click Done.
To add another allowed key, click Add an item, and repeat Step 2.
Click Next.
Configure certificate request methods
To place limitations on the methods that certificate requesters can use to request certificates from the CA pool, do the following:
- Optional: To restrict CSR-based certificate requests, click the toggle.
- Optional: To restrict configuration-based certificate requests, click the toggle.
Configure publishing options
To configure publishing options, do the following:
- Optional: To disallow publishing CA certificates to the Cloud Storage bucket for the CAs in the CA pool, click the toggle.
- Optional: To disallow publishing CRLs to the Cloud Storage bucket for the CAs in the CA pool, click the toggle.
Click the menu to select the encoding format for published CA certificates and CRLs.
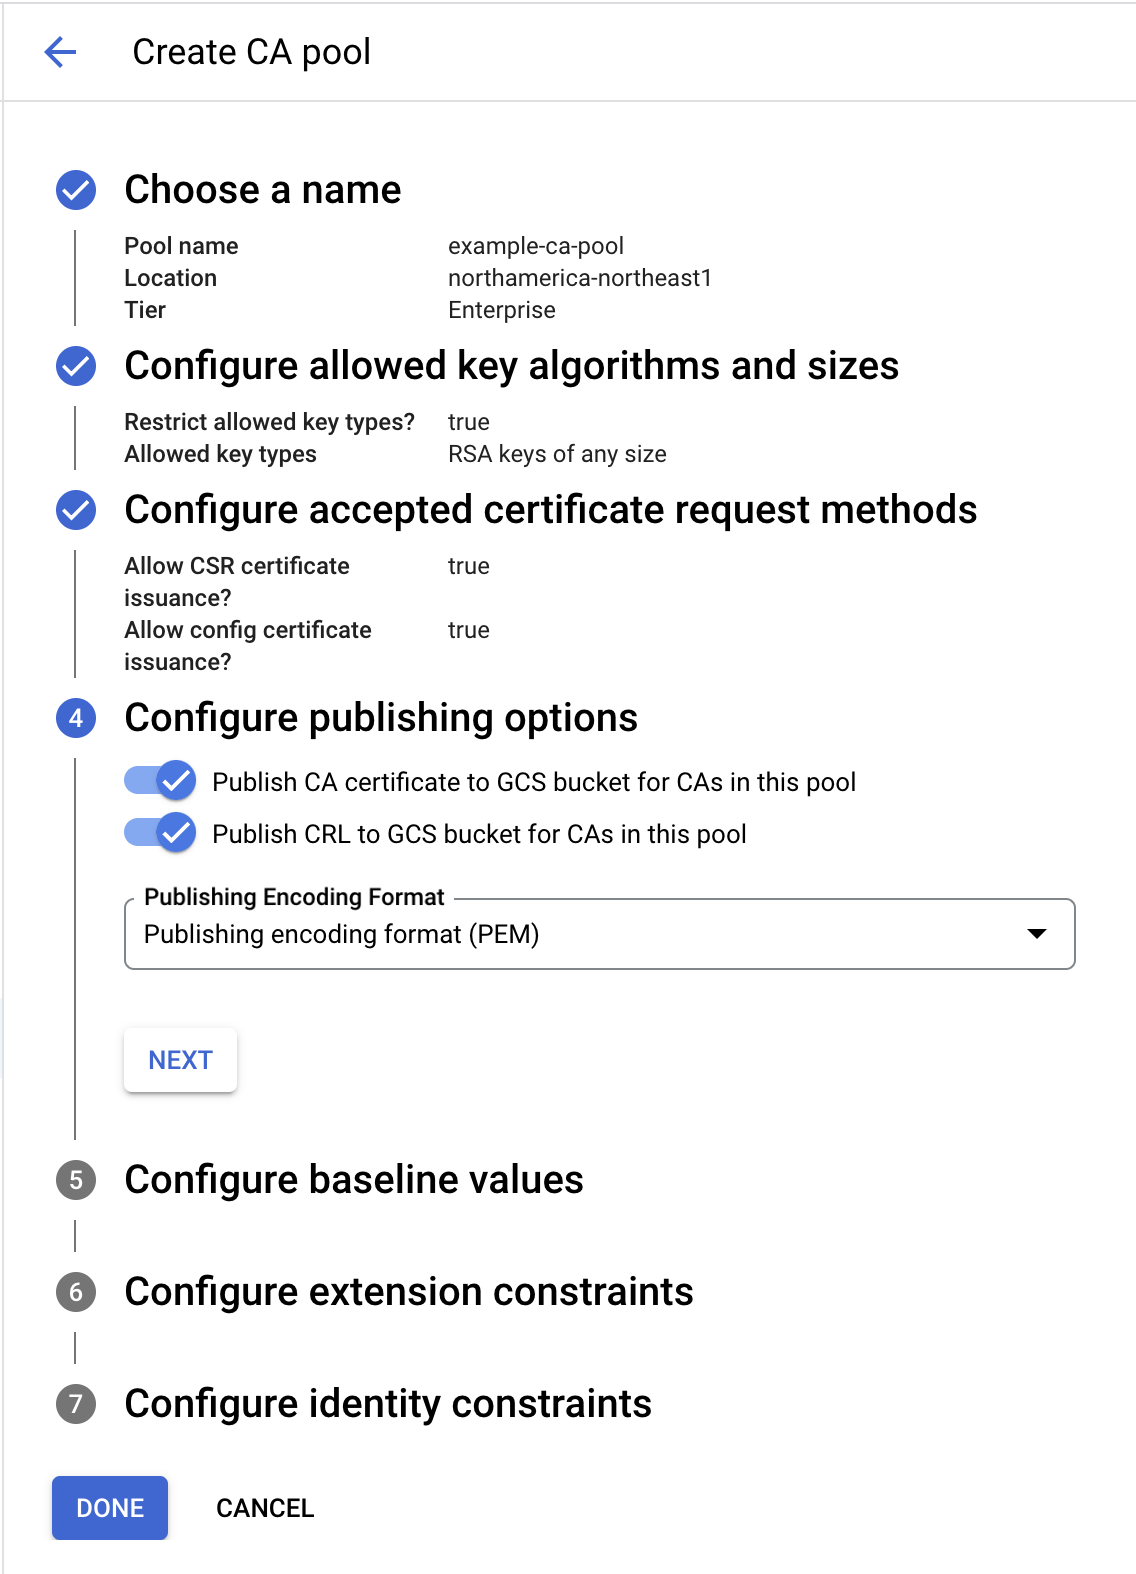
Click Next.
This setting refers to the Key Usage field within a digital
certificate. It specifies how the certificate's private key can be used,
such as for key encipherment, data encipherment, certificate signing, and CRL signing.
For more information, see Key usage.
- To select the base key usages, click the Specify base key usages for certificates issued from this CA pool toggle, and then select from the options listed.
- Click Next.
This setting refers to the Extended Key Usage (EKU) field in a digital
certificate. It provides more specific and refined restrictions on how the key
can be used, such as for server authentication, client authentication, code signing,
and email protection. For more information, see
Extended key usage.
Extended key usages are defined using object identifiers (OIDs). If you don't configure the extended key usages, all key usage scenarios are allowed.
- To select the extended key usages, click the Write extended key usages for certificates issued from this CA pool toggle, and then select from the options listed.
- Click Next.
The certificate policies extension in the certificate expresses the policies that the issuing CA pool follows. This extension can include information about how identities are validated before certificate issuance, how certificates are revoked, and how the CA pool's integrity is ensured. This extension helps you verify the certificates that the CA pool issues and see how the certificates are used.
For more information, see Certificate policies.
To specify the policy that defines the certificate usage, do the following:
- Add the policy identifier in the Policy identifiers field.
- Click Next.
The AIA extension in a certificate provides the following information:
- Address of the OCSP servers from where you can check the revocation status of the certificate.
- The access method for the issuer of the certificate.
For more information, see Authority information access.
To add the OCSP servers that appear in the AIA extension field in the certificates, do the following:
- Click Add item.
- In the Server URL field, add the URL of the OCSP server.
- Click Done.
- Click Next.
The CA options field within a certificate template defines how the resulting certificate can be used in a certificate authority (CA) hierarchy. CA options determine if a certificate can be used to sign other certificates and, if so, the restrictions on the certificates it issues.
Choose from the following options:
Include the configs to describe the CA X.509 extensions: Specify the settings within a certificate template that control the X.509 extensions.
Restrict issued certificates to be used only for CAs: This option appears only if you select the checkbox mentioned in the previous step. This boolean value indicates whether the certificate is a CA certificate. If set to
true, the certificate can be used to sign other certificates. Iffalse, the certificate is an end-entity certificate and cannot sign other certificates. If you click this toggle, you are further prompted to define name constraints for the extension in CA certificates.Include the configs to describe the path length restriction X.509 extensions: Specify the settings that control how long a chain of certificates can be, stemming from a particular certificate. If the max issuer path length is set to
0, then the CA can only issue end-entity certificates. If it's set to1, then the chain beneath this CA certificate can include only one subordinate CA. If a value isn't declared, then the number of subordinate CAs in the chain beneath this CA is unbounded.- Click Next.
To configure additional custom extensions to include in the certificates issued by the CA pool, do the following:
- Click Add item.
- In the Object identifier field, add a valid object identifier that is formatted as dot-separated digits.
- In the Value field, add the base64-encoded value for the identifier.
- If the extension is critical, select Extension is critical.
To save all the baseline value configurations, click Done.
To create the CA pool, click Done.
gcloud
Run the following command:
gcloud privateca pools create POOL_NAME --location=LOCATION
Replace the following:
- POOL_NAME: the name of the CA pool.
- LOCATION: the location where you want to create the CA pool. For the complete list of locations, see Locations.
If you don't specify which tier you require for your CA pool, the
Enterprise tier is selected by default. If you want to specify the tier
for your CA pool, run the following gcloud command:
gcloud privateca pools create POOL_NAME --location=LOCATION --tier=TIER_NAME
Replace the following:
- POOL_NAME: the name of your CA pool.
- LOCATION: the location where you want to create the CA pool. For the complete list of locations, see Locations.
- TIER_NAME: either
devopsorenterprise. For more information, see Select the operation tiers.
If you don't specify the publishing encoding format for your CA pool, the
PEM publishing encoding format is selected by default. If you want to
specify the publishing encoding format for your CA pool, run the following
gcloud command:
gcloud privateca pools create POOL_NAME --location=LOCATION --publishing-encoding-format=PUBLISHING_ENCODING_FORMAT
Replace the following:
- POOL_NAME: the name of your CA pool.
- LOCATION: the location where you want to create the CA pool. For the complete list of locations, see Locations.
- PUBLISHING_ENCODING_FORMAT: either
PEMorDER.
For more information about the gcloud privateca pools create command, see
gcloud privateca pools
create.
For information about placing restrictions on the type of certificates that a CA pool can issue, see Add a certificate issuance policy to a CA pool.
Terraform
Go
To authenticate to CA Service, set up Application Default Credentials. For more information, see Set up authentication for a local development environment.
Java
To authenticate to CA Service, set up Application Default Credentials. For more information, see Set up authentication for a local development environment.
Python
To authenticate to CA Service, set up Application Default Credentials. For more information, see Set up authentication for a local development environment.
REST API
Create a CA pool.
HTTP method and URL:
POST https://privateca.googleapis.com/v1/projects/PROJECT_ID/locations/LOCATION/caPools\?ca_pool_id=POOL_ID
Request JSON body:
{
  "tier": "ENTERPRISE"
}
To send your request, expand one of these options:
You should receive a JSON response similar to the following:
{
    "name": "projects/PROJECT_ID/locations/LOCATION/operations/operation-UUID",
    "metadata": {...},
    "done": false
}
Poll the operation until it is complete.
The operation is complete when the long-running operation's
doneproperty is set totrue.HTTP method and URL:
GET https://privateca.googleapis.com/v1/projects/PROJECT_ID/locations/LOCATION/operations/operation-UUID
To send your request, expand one of these options:
You should receive a JSON response similar to the following:
{
    "name": "projects/PROJECT_ID/locations/LOCATION/operations/operation-UUID",
    "metadata": {...},
    "done": true,
    "response": {
      "@type": "type.googleapis.com/google.cloud.security.privateca.v1.CaPool",
      "name": "...",
      "tier": "ENTERPRISE"
    }
}
Add or update labels on a CA pool
A label is a key-value pair that helps you organize your CA Service resources. You can filter your resources based on their labels.
To add or update labels on a CA pool, do the following:
Console
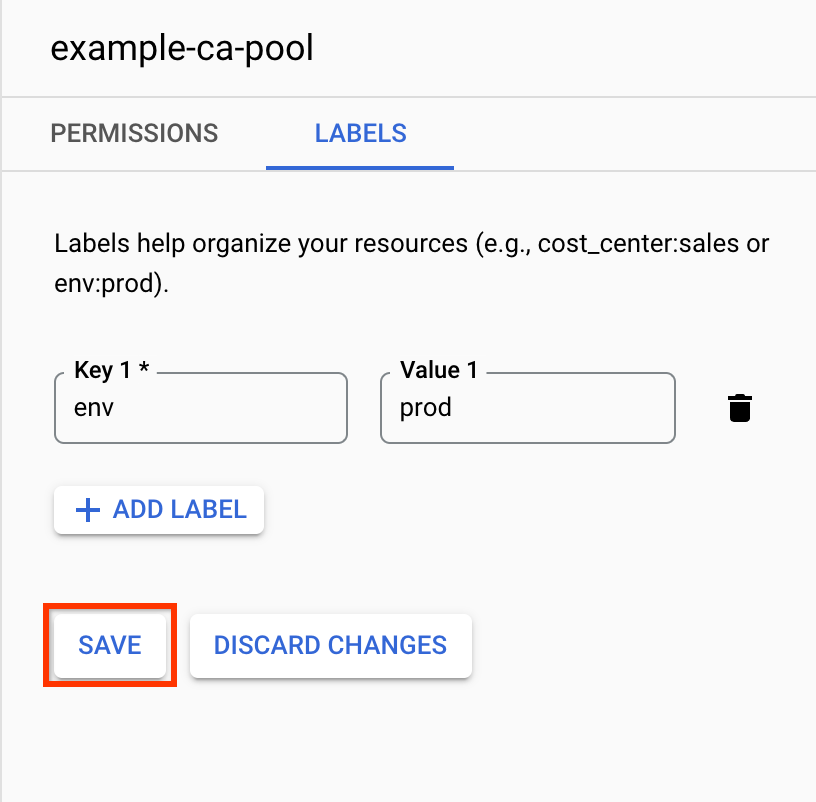
To add a label, do the following:
Go to the Certificate Authority Service page.
In the CA pool manager tab, select the CA pool.
Click Labels.
Click Add label.
Add a key-value pair.
Click Save.
To edit an existing label, do the following:
Go to the Certificate Authority Service page.
In the CA pool manager tab, select the CA pool.
Click Labels.
Edit the value of the label.
Click Save.
gcloud
Run the following command:
gcloud privateca pools update POOL_ID --location=LOCATION --update-labels foo=bar
Replace the following:
- POOL_ID: the name of the CA pool.
- LOCATION: the location of the CA pool. For the complete list of locations, see Locations.
What's next
- Learn how to create a root CA.
- Learn how to create a subordinate CA.
- Learn how to use a certificate issuance policy.
- Learn how to increase certificate creation throughput using CA pools.
- Learn how to update and delete a CA pool.