You can use a glossary to define terminology specific to your domain. With a glossary, you can add term pairs, including a source and target language term. The term pairs ensure that the Vertex AI Translation service consistently translates your terminology.
The following are examples of cases where you can define glossary entries:
- Product names: Identify product names to keep them in the translation. For example, Google Home must translate to Google Home.
- Ambiguous words: Specify the meaning of vague words and homonyms. For example, bat can mean a piece of sports equipment or an animal.
- Borrowed words: Clarify the meaning of words adopted from a different language. For example, bouillabaisse in French translates to bouillabaisse in English, a fish stew dish.
The terms in a glossary can be single words (also referred to as tokens) or short phrases, usually shorter than five words. Vertex AI Translation ignores matching glossary entries if the words are stopwords.
Vertex AI Translation offers the following glossary methods available in Google Distributed Cloud (GDC) air-gapped:
| Method | Description |
|---|---|
CreateGlossary |
Create a glossary. |
GetGlossary |
Return a stored glossary. |
ListGlossaries |
Return a list of glossary IDs in a project. |
DeleteGlossary |
Delete a glossary that you no longer need. |
Before you begin
Before creating a glossary to define your terminology for translation, you must
have a project named translation-glossary-project. The custom resource of the
project must look like in the following example:
  apiVersion: resourcemanager.gdc.goog/v1
  kind: Project
  metadata:
    labels:
      atat.config.google.com/clin-number: CLIN_NUMBER
      atat.config.google.com/task-order-number: TASK_ORDER_NUMBER
    name: translation-glossary-project
    namespace: platform
To get the permissions you need to use a glossary, ask your Project IAM Admin to grant you the following roles in your project namespace:
- AI Translation Developer: Get the
AI Translation Developer (
ai-translation-developer) role to access the Vertex AI Translation service. - Project Bucket Admin: Get the Project Bucket Admin
(
project-bucket-admin) role to manage storage buckets and objects within buckets, which lets you create and upload files.
For more information about prerequisites, see Set up a translation project.
Create a glossary file
You must create a glossary file to store your source language and target language terms. This section contains the two different glossary layouts you can use to define your terms.
The following table describes the limits supported on Distributed Cloud for glossary files:
| Description | Limit |
|---|---|
| Maximum file size | 10.4 million (10,485,760) UTF-8 bytes |
| Maximum length of a glossary term | 1,024 UTF-8 bytes |
| Maximum number of glossary resources for a project | 10,000 |
Choose one of the following layouts for your glossary file:
- Unidirectional glossary: Specify the expected translation for a pair of source and target terms in a specific language. Unidirectional glossaries support TSV, CSV, and TMX file formats.
- Equivalent term set glossary: Specify the expected translation in multiple languages on each row. Equivalent term set glossaries support CSV file formats.
Unidirectional glossary
The Vertex AI Translation API accepts tab-separated values (TSV) and
comma-separated values (CSV). Each row contains a pair of terms separated by a
tab (\t) or a comma (,) for these file formats.
The Vertex AI Translation API also accepts the Translation Memory eXchange (TMX) format, a standard XML format for providing the translation's source and target term pairs. The supported input files are in a format based on TMX version 1.4.
The following examples show the required structure for TSV, CSV, and TMX file formats of unidirectional glossaries:
TSV and CSV
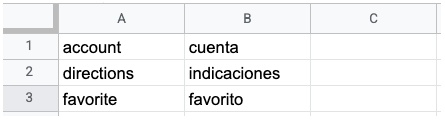
The following image shows two columns in a TSV or CSV file. The first column contains the source language term, and the second column contains the target language term.
When you create a glossary file, you can define a header row. The glossary request makes the file available to the Vertex AI Translation API.
TMX
The following example illustrates the required structure in a TMX file:
<?xml version='1.0' encoding='utf-8'?>
<!DOCTYPE tmx SYSTEM "tmx14.dtd">
<tmx version="1.4">
  <header segtype="sentence" o-tmf="UTF-8" adminlang="en" srclang="en" datatype="PlainText"/>
  <body>
    <tu>
      <tuv xml:lang="en">
        <seg>account</seg>
      </tuv>
      <tuv xml:lang="es">
        <seg>cuenta</seg>
      </tuv>
    </tu>
    <tu>
      <tuv xml:lang="en">
        <seg>directions</seg>
      </tuv>
      <tuv xml:lang="es">
        <seg>indicaciones</seg>
      </tuv>
    </tu>
  </body>
</tmx>
If your file contains XML tags that are not shown in this example, the Vertex AI Translation API ignores those tags.
Include the following elements in your TMX file to ensure successful processing by the Vertex AI Translation API:
<header>: Identify the source language using thesrclangattribute.<tu>: Include a pair of<tuv>elements with the same source and target languages. These<tuv>elements comply with the following:- Each
<tuv>element identifies the language of the contained text using thexml:langattribute. Use ISO-639-1 codes to identify the source and target languages. See the list of supported languages and their respective language codes. - If a
<tu>element contains more than two<tuv>elements, the Vertex AI Translation API only processes the first<tuv>element matching the source language and the first<tuv>element matching the target language. The service ignores the rest of the<tuv>elements. - If a
<tu>element doesn't have a matching pair of<tuv>elements, the Vertex AI Translation API ignores the invalid<tu>element.
- Each
<seg>: Represent generalized strings of text. The Vertex AI Translation API excludes the markup tags from a<seg>element before processing the file. If a<tuv>element contains more than one<seg>element, the Vertex AI Translation API concatenates the text into a single element with a space between the text strings.
After identifying the glossary terms in your unidirectional glossary, upload the file to a storage bucket and make it available to the Vertex AI Translation API by creating and importing a glossary.
Equivalent term set glossary
The Vertex AI Translation API accepts glossary files for equivalent term sets using the CSV format. To define equivalent term sets, create a multi-column CSV file in which each row lists a single glossary term in multiple languages. See the list of supported languages and their respective language codes.
The following image shows an example of a multi-column CSV file. Each row represents a glossary term, and each column represents a translation of the term into different languages.
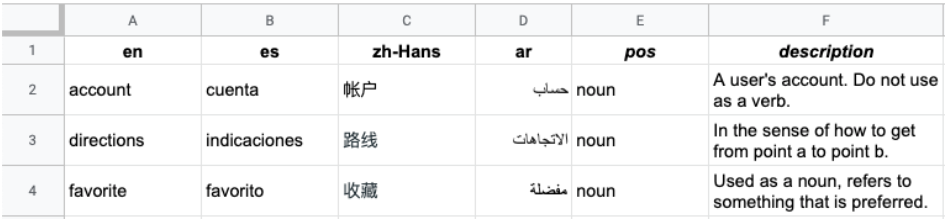
The header is the first row in the file, which identifies the language for each
column. The header row uses the ISO-639-1 or BCP-47 standard language codes. The
Vertex AI Translation API doesn't use part-of-speech (pos)
information, and specific position values aren't validated.
Each subsequent row contains equivalent glossary terms in the languages identified in the header. You can leave columns blank if the term isn't available in all languages.
After identifying the glossary terms in your equivalent term set, upload the file to a storage bucket and make it available to the Vertex AI Translation API by creating and importing a glossary.
Upload your glossary file to a storage bucket
Follow these steps to upload your glossary file to a storage bucket:
- Configure the gdcloud CLI for object storage.
Create a storage bucket in your project namespace. Use a
Standardstorage class.You can create the storage bucket by deploying a
Bucketresource in your project namespace:apiVersion: object.gdc.goog/v1 kind: Bucket metadata: name: glossary-bucket namespace: translation-glossary-project spec: description: bucket for translation glossary storageClass: Standard bucketPolicy: lockingPolicy: defaultObjectRetentionDays: 90Grant
readpermissions on the bucket to the service account (ai-translation-system-sa) used by the Vertex AI Translation service.You can follow these steps to create the role and role binding using custom resources:
Create the role by deploying a
Roleresource in the project namespace:apiVersion: rbac.authorization.k8s.io/v1 kind: Role metadata: name: ai-translation-glossary-reader namespace: translation-glossary-project rules: - apiGroups: - object.gdc.goog resources: - buckets verbs: - read-objectCreate the role binding by deploying a
RoleBindingresource in the project namespace:apiVersion: rbac.authorization.k8s.io/v1 kind: RoleBinding metadata: name: ai-translation-glossary-reader-rolebinding namespace: translation-glossary-project roleRef: apiGroup: rbac.authorization.k8s.io kind: Role name: ai-translation-glossary-reader subjects: - kind: ServiceAccount name: ai-translation-system-sa namespace: ai-translation-system
Upload your glossary file to the storage bucket you created. For more information, see Upload and download storage objects in projects.
Create a glossary
The CreateGlossary method creates a glossary and returns the identifier to the
long-running operation that
generates the glossary.
To create a glossary, replace the following before using any of the request data:
ENDPOINT: the Vertex AI Translation endpoint that you use for your organization. For more information, view service status and endpoints.PROJECT_ID: your project ID.GLOSSARY_ID: your glossary ID, which is your resource name.BUCKET_NAME: the name of the storage bucket where your glossary file is located.GLOSSARY_FILENAME: the name of your glossary file in the storage bucket.
The following is the syntax for an HTTP request to create a glossary:
POST https://ENDPOINT/v3/projects/PROJECT_ID/glossaries
According to the glossary file you created, choose one of the following options to create a glossary:
Unidirectional
To create a unidirectional glossary, specify a language pair
(language_pair) with a source language (source_language_code) and a
target language (target_language_code).
Follow these steps to create a unidirectional glossary:
Save the following request body in a JSON file named
request.json:{ "name":"projects/PROJECT_ID/glossaries/GLOSSARY_ID, "language_pair": { "source_language_code": "SOURCE_LANGUAGE", "target_language_code": "TARGET_LANGUAGE" }, "{"input_config": { "s3_source": { "input_uri": "s3://BUCKET_NAME/GLOSSARY_FILENAME" } } }Replace the following:
SOURCE_LANGUAGE: the language code of the source language of the glossary. See the list of supported languages and their respective language codes.TARGET_LANGUAGE: the language code of the target language of the glossary. See the list of supported languages and their respective language codes.
Make the request. The following examples use a REST API method and the command line, but you can also use client libraries to create a unidirectional glossary.
curl
curl -X POST \
-H "Authorization: Bearer TOKEN" \
-H "Content-Type: application/json; charset=utf-8" \
-d @request.json \
"https://ENDPOINT/v3/projects/PROJECT_ID/glossaries"
Replace TOKEN with
the authentication token
you obtained.
PowerShell
$cred = TOKEN
$headers = @{ "Authorization" = "Bearer $cred" }
Invoke-WebRequest
  -Method POST
  -Headers $headers
  -ContentType: "application/json; charset=utf-8"
  -InFile request.json
  -Uri "https://ENDPOINT/v3/projects/PROJECT_ID/glossaries"
  | Select-Object -Expand Content
Replace TOKEN with
the authentication token
you obtained.
You must receive a JSON response similar to the following:
{
"name": "projects/PROJECT_ID/operations/operation-id",
"metadata": {
    "@type": "type.googleapis.com/google.cloud.translation.v3.CreateGlossaryMetadata",
    "name": "projects/PROJECT_ID/glossaries/GLOSSARY_ID",
    "state": "RUNNING",
    "submitTime": TIME
  }
}
Equivalent term set
To create an equivalent term set glossary, specify a language set
(language_codes_set) with the language codes (language_codes) of the
glossary.
Follow these steps to create an equivalent term set glossary:
Save the following request body in a JSON file named
request.json:{ "name":"projects/PROJECT_ID/glossaries/GLOSSARY_ID", "language_codes_set": { "language_codes": ["LANGUAGE_CODE_1", "LANGUAGE_CODE_2", "LANGUAGE_CODE_3", ... ] }, "input_config": { "s3_source": { "input_uri": "s3://BUCKET_NAME/GLOSSARY_FILENAME" } } }Replace
LANGUAGE_CODEwith the code of the language or languages of the glossary. See the list of supported languages and their respective language codes.Make the request:
curl
curl -X POST \
    -H "Authorization: Bearer TOKEN" \
    -H "Content-Type: application/json; charset=utf-8" \
    -d @request.json \
    "https://ENDPOINT/v3/projects/PROJECT_ID/glossaries"
Replace TOKEN with
the authentication token
you obtained.
You must receive a JSON response similar to the following:
{
  "name": "projects/PROJECT_ID/operations/GLOSSARY_ID,
  "metadata": {
    "@type": "type.googleapis.com/google.cloud.translation.v3.CreateGlossaryMetadata",
    "name": "projects/PROJECT_ID/glossaries/GLOSSARY_ID",
    "state": "RUNNING",
    "submitTime": TIME
  }
}
PowerShell
$cred = TOKEN
$headers = @{ "Authorization" = "Bearer $cred" }

Invoke-WebRequest `
  -Method POST `
  -Headers $headers `
  -ContentType: "application/json; charset=utf-8" `
  -InFile request.json `
  -Uri "https://ENDPOINT/v3/projects/PROJECT_ID/glossaries"
  | Select-Object -Expand Content
Replace TOKEN with
the authentication token
you obtained.
You must receive a JSON response similar to the following:
{
  "name": "projects/PROJECT_ID/operations/GLOSSARY_ID",
  "metadata": {
    "@type": "type.googleapis.com/google.cloud.translation.v3.CreateGlossaryMetadata",
    "name": "projects/PROJECT_ID/glossaries/GLOSSARY_ID",
    "state": "RUNNING",
    "submitTime": TIME
  }
}
Python
Install the latest version of the Vertex AI Translation client library.
Add the following code to the Python script you created:
from google.cloud import translate_v3 as translate

def create_glossary(
    project_id=PROJECT_ID,
    input_uri= "s3://BUCKET_NAME/GLOSSARY_FILENAME",
    glossary_id=GLOSSARY_ID,
    timeout=180,
):

    client = translate.TranslationServiceClient()

    # Supported language codes
    source_lang_code = "LANGUAGE_CODE_1"
    target_lang_code = "LANGUAGE_CODE_2", "LANGUAGE_CODE_3", ...
Save the Python script.
Run the Python script:
python SCRIPT_NAME
Replace SCRIPT_NAME with the name you gave to your
Python script, such as glossary.py.
For more information on the create_glossary method, see the Python client library.
Depending on the size of the glossary file, creating a glossary typically takes less than 10 minutes to complete. You can retrieve the status of this operation to know when it is finished.
Get a glossary
The GetGlossary method returns a stored glossary. If the glossary doesn't
exist, the output returns the NOT_FOUND value. To call the GetGlossary
method, specify your project ID and the glossary ID. Both the
CreateGlossary and ListGlossaries
methods return the glossary ID.
For example, the following requests return information about a specific glossary in your project:
curl
curl -X GET \
   -H "Authorization: Bearer TOKEN" \
   "http://ENDPOINT/v3/projects/PROJECT_ID/glossaries/GLOSSARY_ID"
Replace TOKEN with
the authentication token
you obtained.
Python
from google.cloud import translate_v3 as translate

def get_glossary(project_id="PROJECT_ID", glossary_id="GLOSSARY_ID"):
    """Get a particular glossary based on the glossary ID."""

client = translate.TranslationServiceClient()

name = client.glossary_path(project_id, glossary_id)

response = client.get_glossary(name=name)
print(u"Glossary name: {}".format(response.name))
print(u"Input URI: {}".format(response.input_config.s3_source.input_uri))
List glossaries
The ListGlossaries method returns a list of glossary IDs in a project. If a
glossary doesn't exist, the output returns the NOT_FOUND value. To call the
ListGlossaries method, specify your project ID and the
Vertex AI Translation endpoint.
For example, the following request returns a list of glossary IDs in your project:
curl -X GET \
    -H "Authorization: Bearer TOKEN" \
    "http://ENDPOINT/v3/projects/PROJECT_ID/glossaries?page_size=10"
Replace TOKEN with
the authentication token
you obtained.
Delete a glossary
The DeleteGlossary method deletes a glossary. If the glossary doesn't exist,
the output returns the NOT_FOUND value. To call the DeleteGlossary method,
specify your project ID, glossary ID, and the
Vertex AI Translation endpoint.
Both the
CreateGlossary and ListGlossaries
methods return the glossary ID.
For example, the following request deletes a glossary from your project:
curl -X DELETE \
    -H "Authorization: Bearer TOKEN" \
    "http://ENDPOINT/v3/projects/PROJECT_ID/glossaries/GLOSSARY_ID"
Replace TOKEN with
the authentication token
you obtained.