SAML configuration for Microsoft Azure
Supported in:
Before you begin
Ensure the SAML account is set up in Azure before referencing the following documents:
- Create and assign a user account in Azure Active Directory
- How to create an app in Azure
- How to configure the SAML provider in Azure
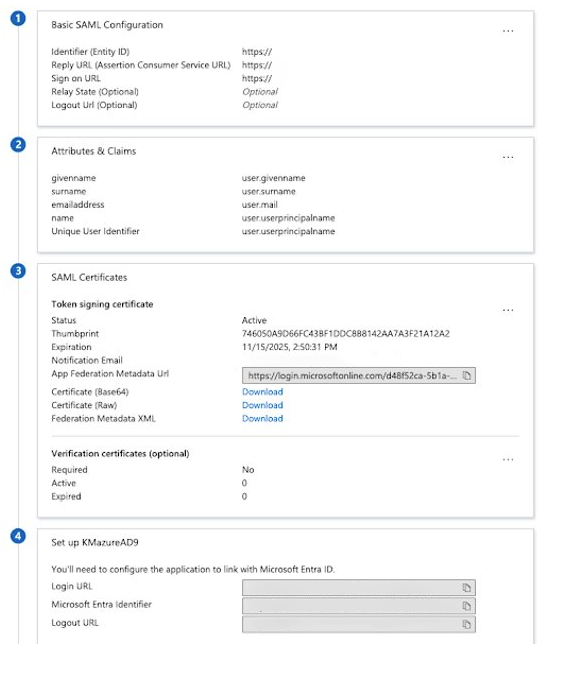
Configure information in the Microsoft Azure portal
- Sign in to the Azure portal.
- Navigate to Enterprise Applications.
- Locate your company's SAML sign-on app.
- In the left sidebar, select Single Sign-on.
- In Section 1, Basic SAML Configuration, configure the
following fields and save the changes:
- Identifier (Entity ID):
https://platform_Address/Saml2/ - Reply URL (Assertion Consumer Service URL):
https://platform_Address/Saml2/ACS - Sign on URL:
https://platform_Address/Saml2/
- Identifier (Entity ID):
 .
.
Configure Azure in Google SecOps SOAR
- Go to Settings > Advanced > External Authentication.
- Create a new SAML provider.
- In the Provider Type menu, select Custom SAML Provider.
- Enter a provider name. For example,
mycompany_Azure.
The other fields are filled using information from the Azure portal as follows:
IDP Metadata- Return to the Azure portal.
- In the SAML Certificates section, locate the Federation Metadata XML field.
- Click Download and save the XML file.
- Return to the Google Security Operations platform.
- In the IDP Metadata field, upload the XML file you just got from the Azure platform.
- Return to the Azure portal.
- In the Set up \
section, locate the Microsoft Entra Identifier field. - Copy the data in the field.
- Return to the Google SecOps platform.
- Paste the value into the Identifier field.
- Return to the Azure portal.
- In the Basic SAML Configuration section, locate the Sign On URL field.
- Copy the data in the field.
- Return to the Google SecOps platform.
- Paste the value into the ACS URL field.
Legend
| Field Name in Google SecOps SOAR | Field Name in Microsoft Azure |
|---|---|
| IDP Metadata | Federation Metadata XML |
| Identifier | Microsoft Entra Identifier |
| ACS URL | Sign on URL |
For more information, see External Authentication.
Need more help? Get answers from Community members and Google SecOps professionals.
