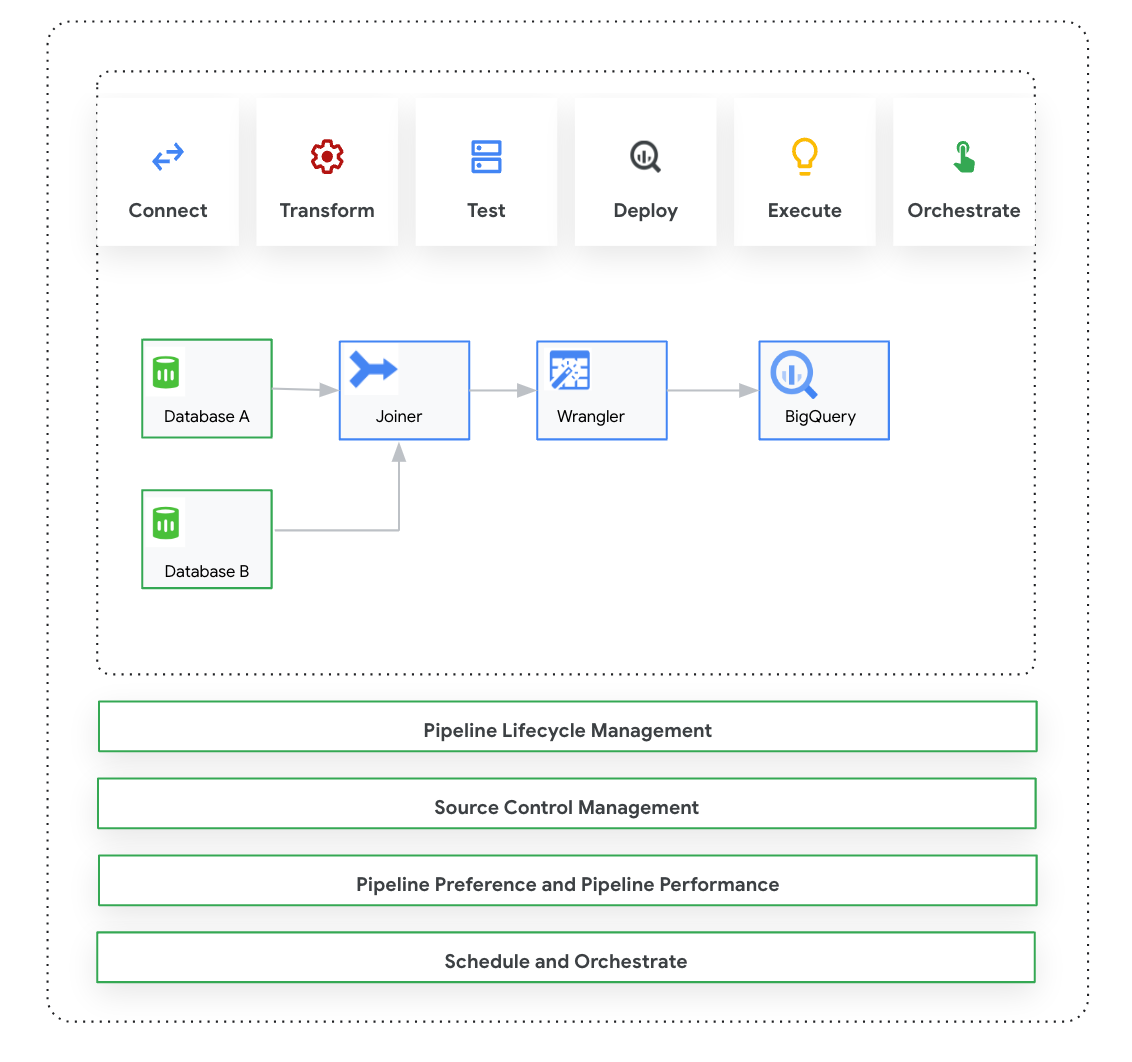
This page introduces Cloud Data Fusion: Studio, which is a visual, click-and-drag interface for building data pipelines from a library of prebuilt plugins and an interface where you configure, execute, and manage your pipelines. Building a pipeline in the Studio typically follows this process:
- Connect to an on-premises or cloud data source.
- Prepare and transform your data.
- Connect to the destination.
- Test your pipeline.
- Execute your pipeline.
- Schedule and trigger your pipelines.
After you design and execute the pipeline, you can manage pipelines on the Cloud Data Fusion Pipeline Studio page:
- Reuse pipelines by parameterizing them with preferences and runtime arguments.
- Manage pipeline execution by customizing compute profiles, managing resources, and fine-tuning pipeline performance.
- Manage pipeline lifecycle by editing pipelines.
- Manage pipeline source control using Git integration.
Before you begin
- Enable the Cloud Data Fusion API.
- Create a Cloud Data Fusion instance.
- Understand access control in Cloud Data Fusion.
- Understand key concepts and terms in Cloud Data Fusion.
Cloud Data Fusion: Studio overview
The Studio includes the following components.
Administration
Cloud Data Fusion lets you have multiple namespaces in each instance. Within the Studio, administrators can manage all of the namespaces centrally, or each namespace individually.
The Studio provides the following administrator controls:
- System Administration
- The System Admin module in the Studio lets you create new namespaces and define the central compute profile configurations at the system level, which are applicable to each namespace in that instance. For more information, see Manage Studio administration.
- Namespace Administration
- The Namespace Admin module in the Studio lets you manage the configurations for the specific namespace. For each namespace, you can define compute profiles, runtime preferences, drivers, service accounts and git configurations. For more information, see Manage Studio administration.
Pipeline Design Studio
You design and execute pipelines in the Pipeline Design Studio in the Cloud Data Fusion web interface. Designing and executing data pipelines includes the following steps:
- Connect to a source: Cloud Data Fusion allows connections to on-premises and cloud data sources. The Studio interface has default system plugins, which come pre-installed in the Studio. You can download additional plugins from a plugin repository, known as the Hub. For more information, see the Plugins overview.
- Data preparation: Cloud Data Fusion lets you prepare your data using its powerful data preparation plugin: Wrangler. Wrangler helps you view, explore, and transform a small sample of your data in one place before running the logic on the entire dataset in the Studio. This lets you quickly apply transformations to gain an understanding of how they affect the entire dataset. You can create multiple transformations and add them to a recipe. For more information, see the Wrangler overview.
- Transform: Transform plugins change data after it's loaded from a source—for example, you can clone a record, change the file format to JSON, or use the Javascript plugin to create a custom transformation. For more information, see the Plugins overview.
- Connect to a destination: After you prepare the data and apply transformations, you can connect to the destination where you plan to load the data. Cloud Data Fusion supports connections to multiple destinations. For more information, see Plugins overview.
- Preview: After you design the pipeline, to debug issues before you deploy and run a pipeline, you run a Preview job. If you encounter any errors, you can fix them while in Draft mode. The Studio uses the first 100 rows of your source dataset to generate the preview. The Studio displays the status and duration of the Preview job. You can stop the job anytime. You can also monitor the log events as the Preview job runs. For more information, see Preview data.
Manage pipeline configurations: After you preview the data, you can deploy the pipeline and manage the following pipeline configurations:
- Compute configuration: You can change the compute profile that runs the pipeline—for example, you want to run the pipeline against a customized Dataproc cluster rather than the default Dataproc cluster.
- Pipeline configuration: For each pipeline, you can enable or disable instrumentation, such as timing metrics. By default, instrumentation is enabled.
- Engine configuration: Spark is the default execution engine. You can pass custom parameters for Spark.
- Resources: You can specify the memory and number of CPUs for the Spark driver and executor. The driver orchestrates the Spark job. The executor handles the data processing in Spark.
- Pipeline alert: You can configure the pipeline to send alerts and start post-processing tasks after the pipeline run finishes. You create pipeline alerts when you design the pipeline. After you deploy the pipeline, you can view the alerts. To change alert settings, you can edit the pipeline.
- Transformation pushdown: You can enable Transformation pushdown if you want a pipeline to execute certain transformations in BigQuery.
For more information, see Manage pipeline configurations.
Reuse pipelines using macros, preferences, and runtime arguments: Cloud Data Fusion lets you reuse data pipelines. With reusable data pipelines, you can have a single pipeline that can apply a data integration pattern to a variety of use cases and datasets. Reusable pipelines give you better manageability. They let you set most of the configuration of a pipeline at execution time, instead of hard-coding it at design time. In the Pipeline Design Studio, you can use macros to add variables to plugin configurations so that you can specify the variable substitutions at runtime. For more information, see Manage macros, preferences, and runtime arguments.
Execute: Once you have reviewed the pipeline configurations, you can initiate the pipeline execution. You can see the status change during the phases of the pipeline run—for example provisioning, starting, running, and success.
Schedule and orchestrate: Batch data pipelines can be set to run on a specified schedule and frequency. After you create and deploy a pipeline, you can create a schedule. In the Pipeline Design Studio, you can orchestrate pipelines by creating a trigger on a batch data pipeline to have it run when one or more pipeline runs complete. These are called downstream and upstream pipelines. You create a trigger on the downstream pipeline so that it runs based on the completion of one or more upstream pipelines.
Recommended: You can also use Composer to orchestrate pipelines in Cloud Data Fusion. For more information, see Schedule pipelines and Orchestrate pipelines.
Edit pipelines: Cloud Data Fusion lets you edit a deployed pipeline. When you edit a deployed pipeline, it creates a new version of the pipeline with the same name and marks it as the latest version. This lets you develop pipelines iteratively rather than duplicating pipelines, which creates a new pipeline with a different name. For more information, see Edit pipelines.
Source Control Management: Cloud Data Fusion lets you better manage pipelines between development and production with Source Control Management of the pipelines using GitHub.
Logging and monitoring: To monitor pipeline metrics and logs, it's recommended that you enable the Stackdriver logging service to use Cloud Logging with your Cloud Data Fusion pipeline.
What's next
- Learn more about managing Studio administration.