Create a target campaign pipeline
Learn how to use Cloud Data Fusion to clean, transform, and process customer data to select candidates for a target campaign.
To follow step-by-step guidance for this task directly in the Google Cloud console, click Guide me:
Scenario
You want to create custom marketing materials for an ongoing campaign promotion, and you'd like to distribute the materials directly to the home mailboxes of your customers.
Your campaign has two constraints:
- Location: You only deliver to customers in California, Washington, and Oregon.
- Cost: To save on fuel, you deliver to quickly accessible customer homes. You deliver only to customers who live on avenues.
This tutorial shows you how to generate the list of customer addresses for the campaign. In this tutorial, you do the following:
- Clean the customer data: filter customers that live on an avenue in California, Washington, or Oregon.
Create a pipeline that does the following:
- Joins the filtered customer data with a public dataset that contains state abbreviations.
- Stores the cleaned and joined data in a BigQuery table that you can query (by using the BigQuery web interface) or analyze (by using Looker Studio).
Objectives
- Connect Cloud Data Fusion to two data sources
- Apply basic transformations
- Join the two data sources
- Write the output data to a sink
Before you begin
- Sign in to your Google Cloud account. If you're new to Google Cloud, create an account to evaluate how our products perform in real-world scenarios. New customers also get $300 in free credits to run, test, and deploy workloads.
-
In the Google Cloud console, on the project selector page, select or create a Google Cloud project.
-
Make sure that billing is enabled for your Google Cloud project.
-
In the Google Cloud console, on the project selector page, select or create a Google Cloud project.
-
Make sure that billing is enabled for your Google Cloud project.
-
Enable the Cloud Data Fusion, BigQuery, Cloud Storage, and Dataproc APIs.
-
Create a Cloud Data Fusion instance.
This tutorial assumes that you use the default Compute Engine service account.
Manage permissions
Create and assign the required custom roles and permissions.
Create a custom role and add permissions
In the Google Cloud console, go to the Roles page:
Click Create role.
In the Title field, enter
Custom Role-Tutorial.Click Add permissions.
In the Add permissions window, select the following permissions and click Add:
bigquery.datasets.createbigquery.jobs.createstorage.buckets.create
Click Create.
Assign custom role to the default Compute Engine service account
Go to the Cloud Data Fusion Instances page:
Click the name of your instance.
Make a note of the default Dataproc Service Account. The instance details page contains this information.
The following is the format of the Dataproc service account name:
CUSTOMER_PROJECT_NUMBER-compute@developer.gserviceaccount.com.Learn more about Dataproc service accounts.
Go to the IAM page:
In the Filter bar, enter the name of your default Dataproc service account.
For your default Compute Engine service account, click Edit.
Click Add another role.
In the Select a role field, select Custom Role-Tutorial.
Click Save.
Ensure that the service account is already assigned the Cloud Data Fusion Runner role.
Prepare the customer data
This tutorial requires the following two input datasets, both of which are provided with your Cloud Data Fusion instance:
- Sample customer data: A CSV file named
customers.csv. - State abbreviations: A BigQuery table named
state_abbreviations.
Load the customer data
Go to the Cloud Data Fusion Instances page:
For the Cloud Data Fusion instance you are using, click View instance. The Cloud Data Fusion web interface opens in a new tab.
Click Wrangler. The Wrangler page opens.
In the Connections pane, GCS > Sample Buckets.
Click campaign-tutorial.
Click customers.csv.
In the Parsing options window, specify the following:
- Format:
csv - Enable quoted value:
False - Use first row as header:
False - File-encoding:
UTF-8
- Format:
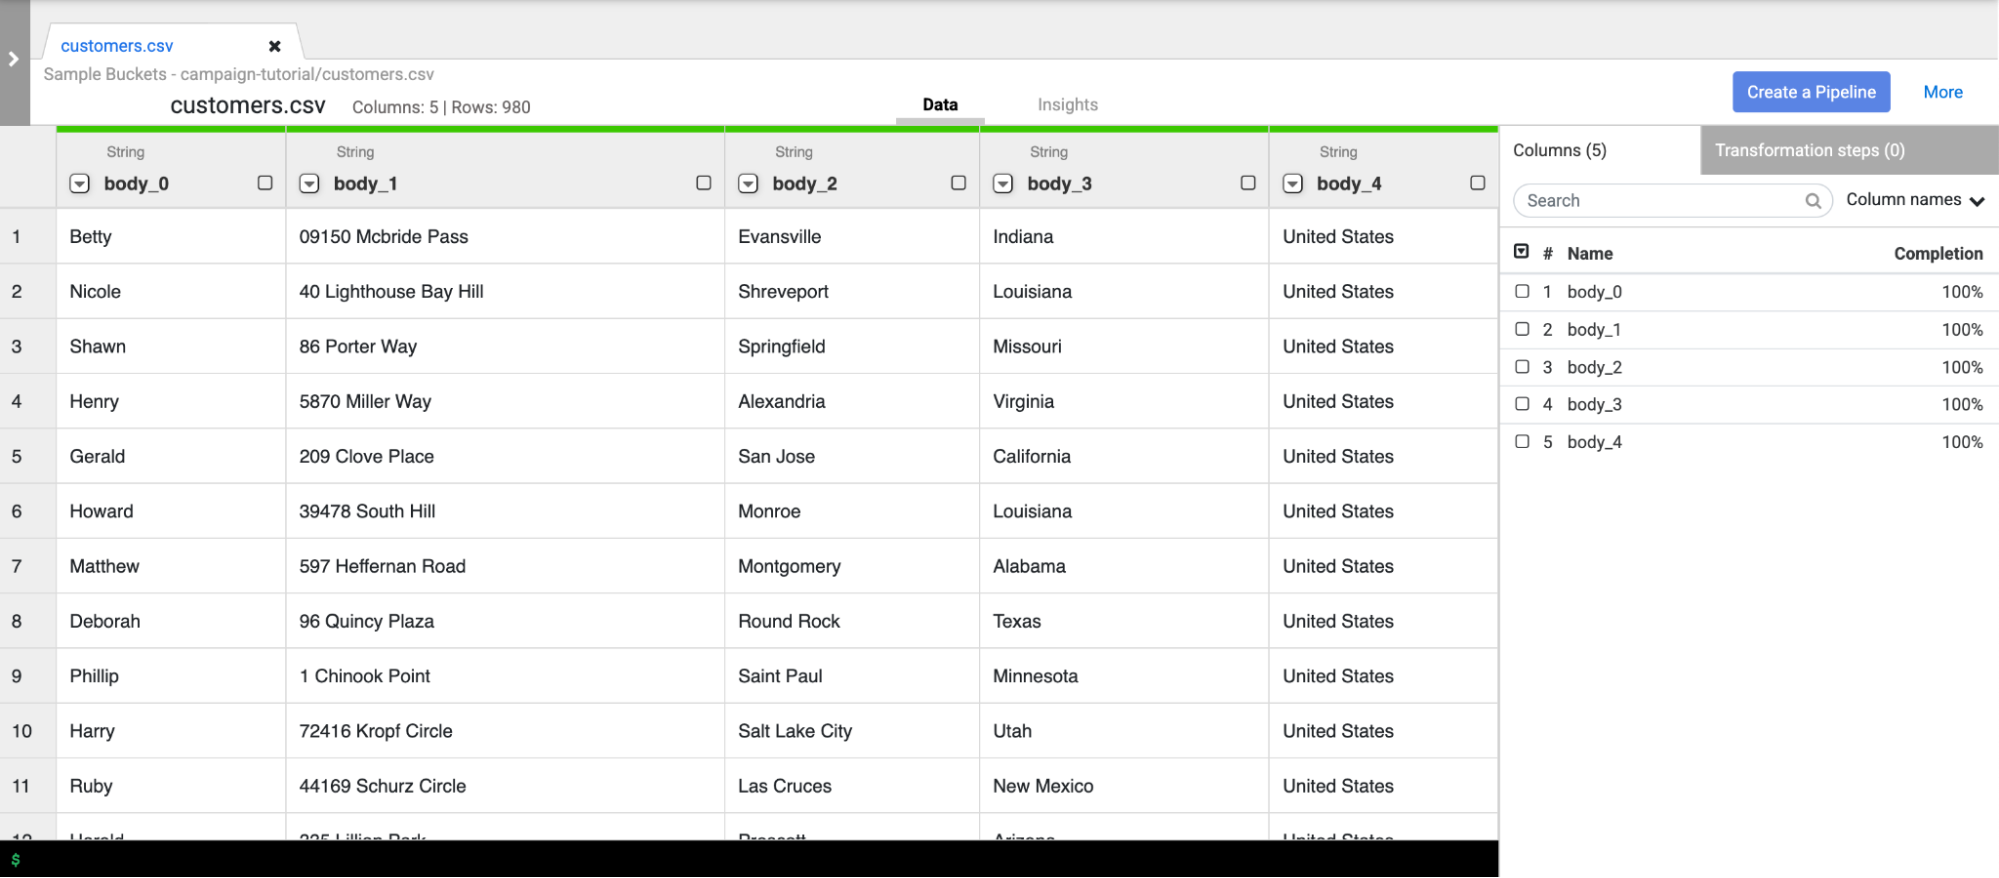
Click Confirm. Customer data is loaded in a new tab in Wrangler.
Clean the customer data
This contains two sub-tasks:
- Setting the schema
- Filtering the customer data to present only the target audience you need
Set the schema
Set the schema of the data by assigning appropriate names to the table
columns. To give the columns, such as body_1 and body_2, more informative
names, follow these steps:.
- In the right pane, click the Columns tab.
- Click the Column names drop-down and select Set all.
In the Bulk set column names dialog, enter the following, comma-separated column names:
Name,StreetAddress,City,State,CountryClick Apply.
Filter the data
Filter the data to display only customers that live in California, Oregon, or Washington.
Remove all rows that contain values other than those states:
- Click the State column drop-down and select Filter.
In the filter window, do the following:
- Click Keep rows.
- Click the If drop-down, and select value matches regex.
Enter the following regular expression:
^(California|Oregon|Washington)$Click Apply.
The values in the State column are California, Oregon, or Washington.
Filter the data to display only customers that live on avenues. Keep
only the addresses that contain the string Avenue:
- Click the StreetAddress column drop-down, and select Filter.
- In the filter window, do the following:
- Click Keep rows.
- Click the If drop-down, select value contains, and enter
Avenue. - Select Ignore case.
- Click Apply.
Before performing parallel-processing jobs on your entire dataset, Wrangler displays only the first 1000 values of your dataset. Because you filtered some data, only a few customers remain in the Wrangler display.
Create a batch pipeline
You've cleaned your data and you've run transformations on a subset of your data. You can now create a batch pipeline to run transformations on your entire dataset.
Cloud Data Fusion translates the pipeline that you build in the Studio into an Apache Spark program that executes transformations in parallel on an ephemeral Dataproc cluster. This process lets you execute complex transformations over vast quantities of data in a scalable, reliable manner, without having to handle the infrastructure.
- On the Wrangler page, click Create a pipeline.
- Select Batch pipeline. The Studio page opens.
On the Studio page, a GCSFile source node is connected to a Wrangler node.
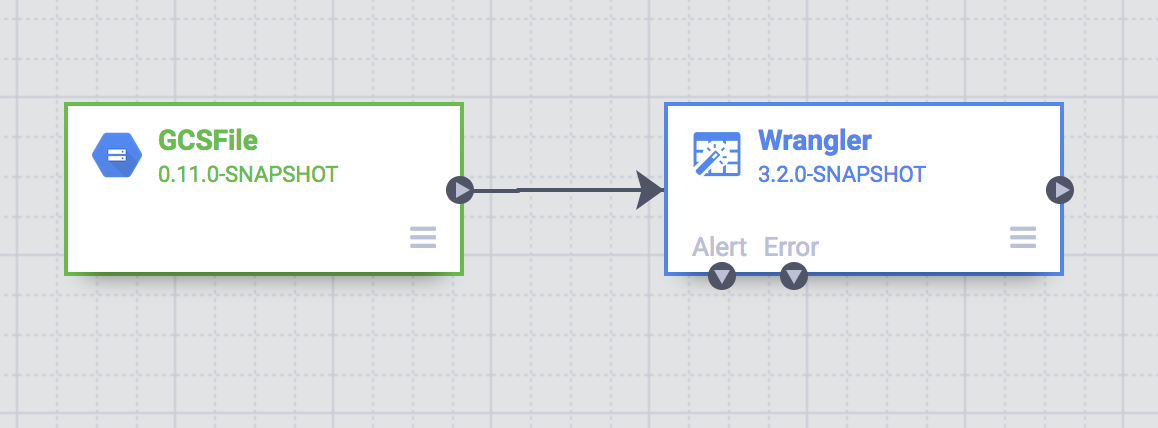
The transformations you applied on the Wrangler page appear in the Wrangler node on the Studio page.
To view the transformations that you applied, hold the pointer over the Wrangler node and click Properties.
The transformations you applied appear in the Directives.
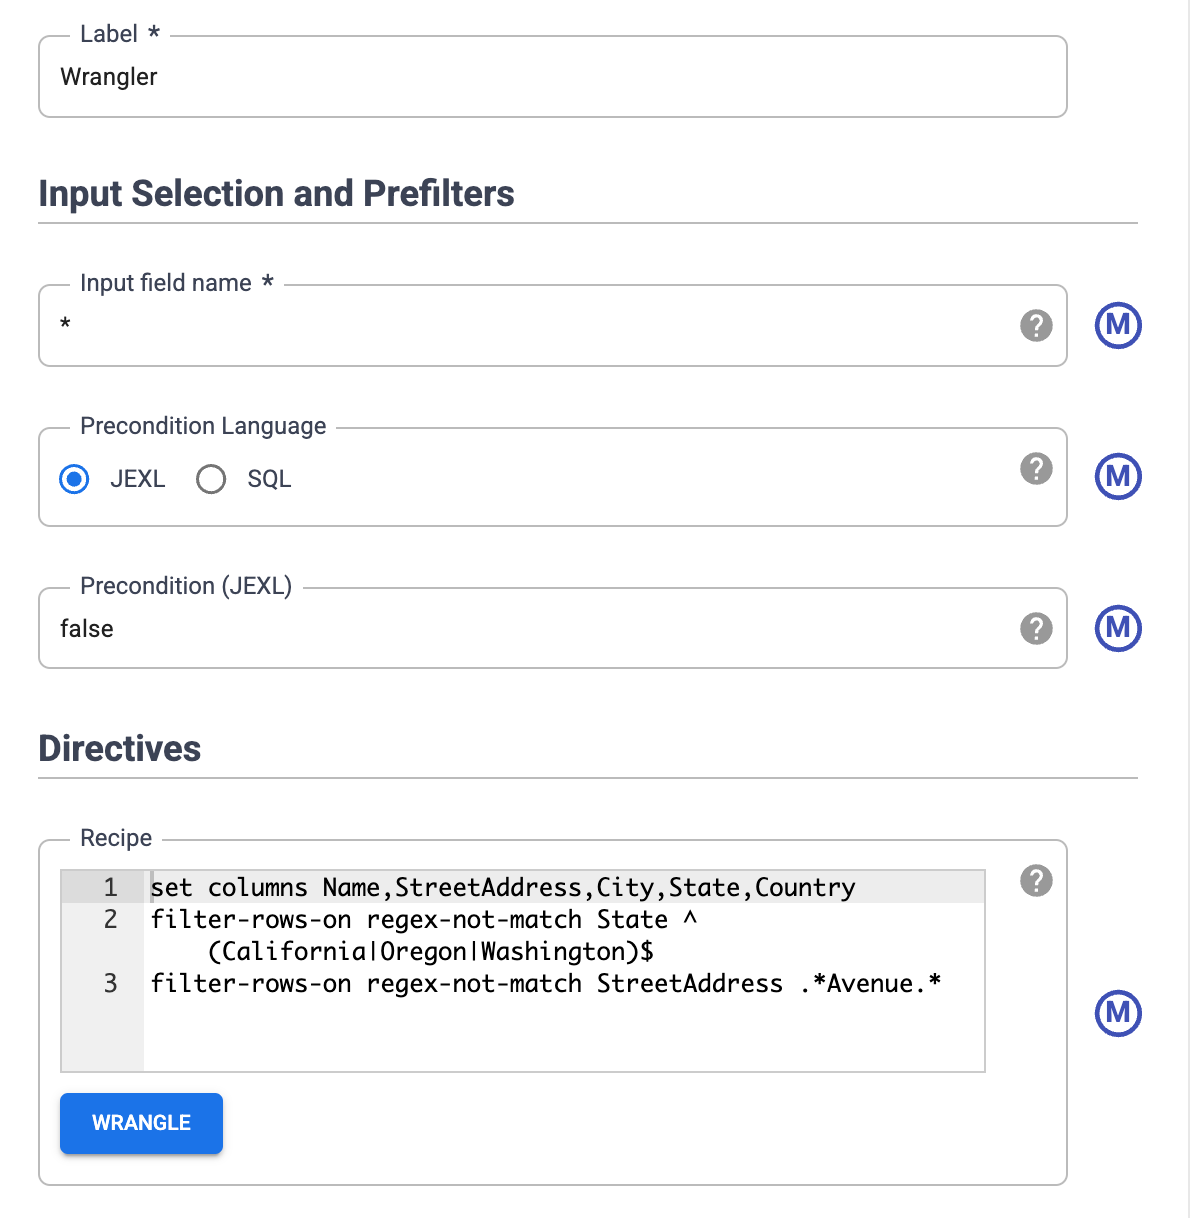
Click Validate.
Click Close.
For example, you realize the Country column isn't needed because the value
is always USA. You delete the column by following these steps:
- Click Wrangle.
- Click the down arrow next to Country and select Delete Column.
- Click Apply. The Wrangler page closes and the Wrangler Properties window
opens on the Studio page. In the Directives,
drop Countryappears. - Click Close.
Abbreviate the state names
The navigation system in your delivery vehicle only recognizes addresses that contain abbreviated state names (CA, not California), and your customer data contains full state names.
The public BigQuery state_abbreviations table contains two
columns: one with the full state names and one with the abbreviated state names.
You can use this table to update the state names in your customer data.
View the state names data in BigQuery
In a separate tab, go to the BigQuery Studio page:
Click Create SQL query and enter the following query in the query editor:
SELECT * FROM `dis-user-guide.campaign_tutorial.state_abbreviations`Click Run.
BigQuery displays a list of state names and their abbreviations.
Access the BigQuery table
Add a source in your pipeline that will access the BigQuery
state_abbreviations table.
- Go to the Cloud Data Fusion Studio page and expand the Source menu.
Click BigQuery.
A BigQuery source node appears on the canvas, along with the other two nodes.
Hold the pointer over the BigQuery source node and click Properties.
- In the Dataset Project ID field, enter
dis-user-guide. - In the Reference Name field, enter
state_abbreviations. - In the Dataset field, enter
campaign_tutorial. - In the Table field, enter
state_abbreviations.
- In the Dataset Project ID field, enter
Populate the schema of the table from BigQuery by clicking Get Schema.
Click Close.
Join the two data sources
To generate output that contains customer data with abbreviated state names, join the two data sources, the customer data, and the state abbreviations.
- Go to the Cloud Data Fusion Studio page and expand the Analytics menu.
Click Joiner.
A Joiner node, representing an action similar to a SQL Join, appears on the canvas.
Connect the Wrangler node and the BigQuery node to the Joiner node: Drag a connection arrow on the right edge of the source node and drop onto the destination node.
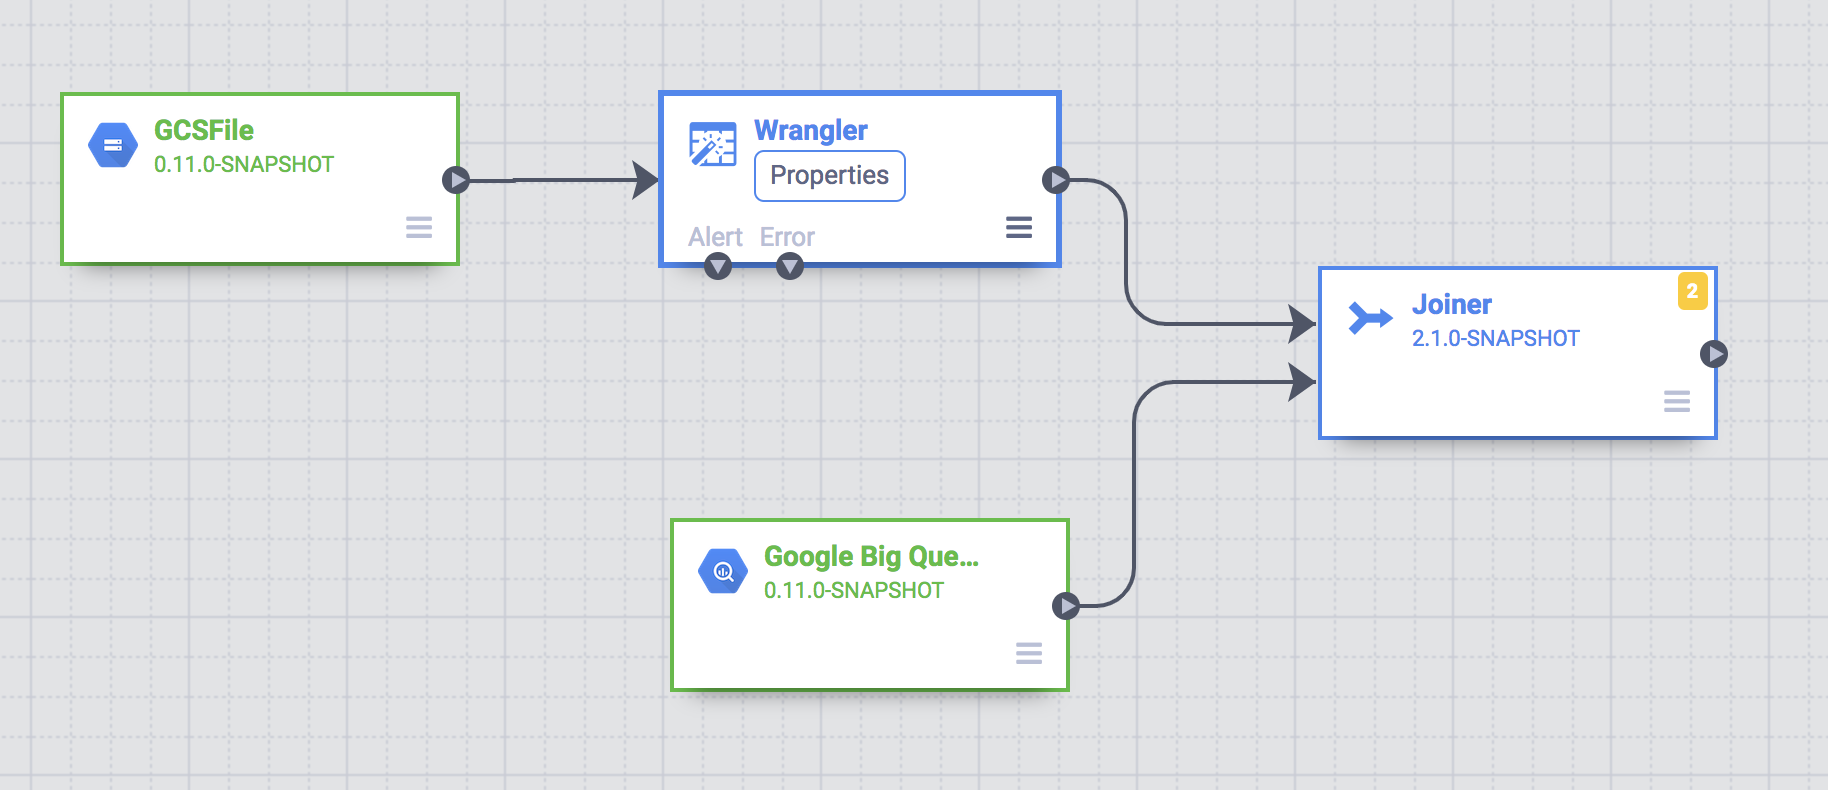
Hold the pointer over the Joiner node and click Properties.
In the Fields section, expand Wrangler and BigQuery.
- Clear the Wrangler state checkbox.
- Clear the BigQuery name checkbox because you want only the abbreviated state name and not the full state name.
Keep the BigQuery abbreviation checkbox selected, and change the alias to
State.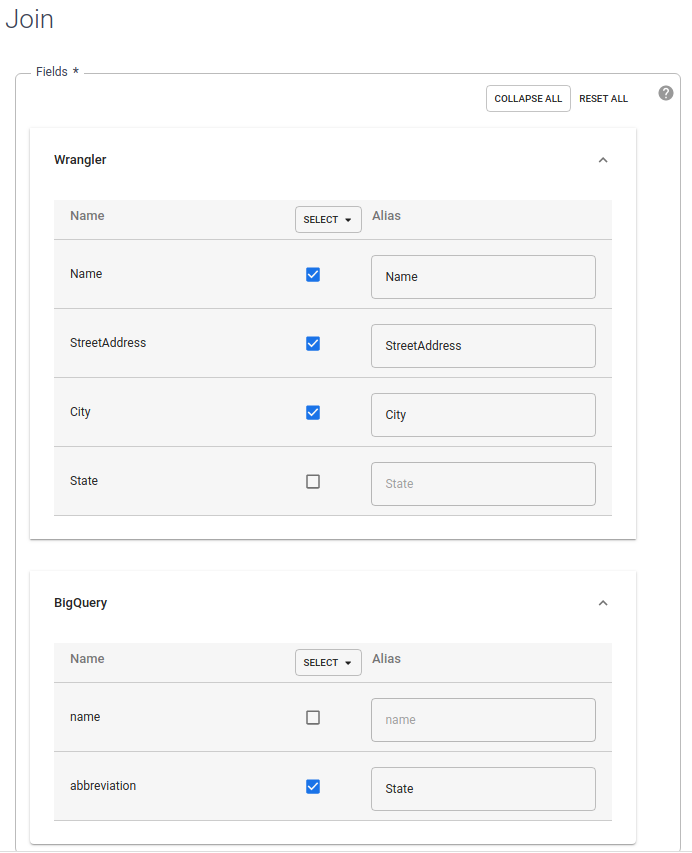
In the Join Type field, leave the value as Outer. For Required inputs, select the Wrangler checkbox.
In the Join condition section, for Wrangler, select State. For BigQuery, select name.
Generate the schema of the resultant join. Click Get Schema.
Click Validate.
Click Close.
Store the output to BigQuery
Store the result of your pipeline into a BigQuery table. Where you store your data is called a sink.
- Go to the Cloud Data Fusion Studio page and expand Sink.
- Click BigQuery.
Connect the Joiner node to the BigQuery node.

Hold the pointer over the BigQuery node and click Properties.
- In the Dataset field, enter
dis_user_guide. - In the Table field, select
customer_data_abbreviated_states. - Click Close.
- In the Dataset field, enter
Deploy and run the pipeline
- On the Studio page, click Name your pipeline and enter
CampaignPipeline. - Click Save.
- In the upper-right corner, click Deploy.
- After deployment completes, click Run.
Running your pipeline can take a few minutes. While you wait, you can observe the Status of the pipeline transition from Provisioning > Starting > Running > Deprovisioning > Succeeded.
View the results
In the Google Cloud console, go to the BigQuery page:
Click Create SQL query.
Query the
customer_data_abbreviated_statestable:SELECT * FROM dis_user_guide.customer_data_abbreviated_states LIMIT 1000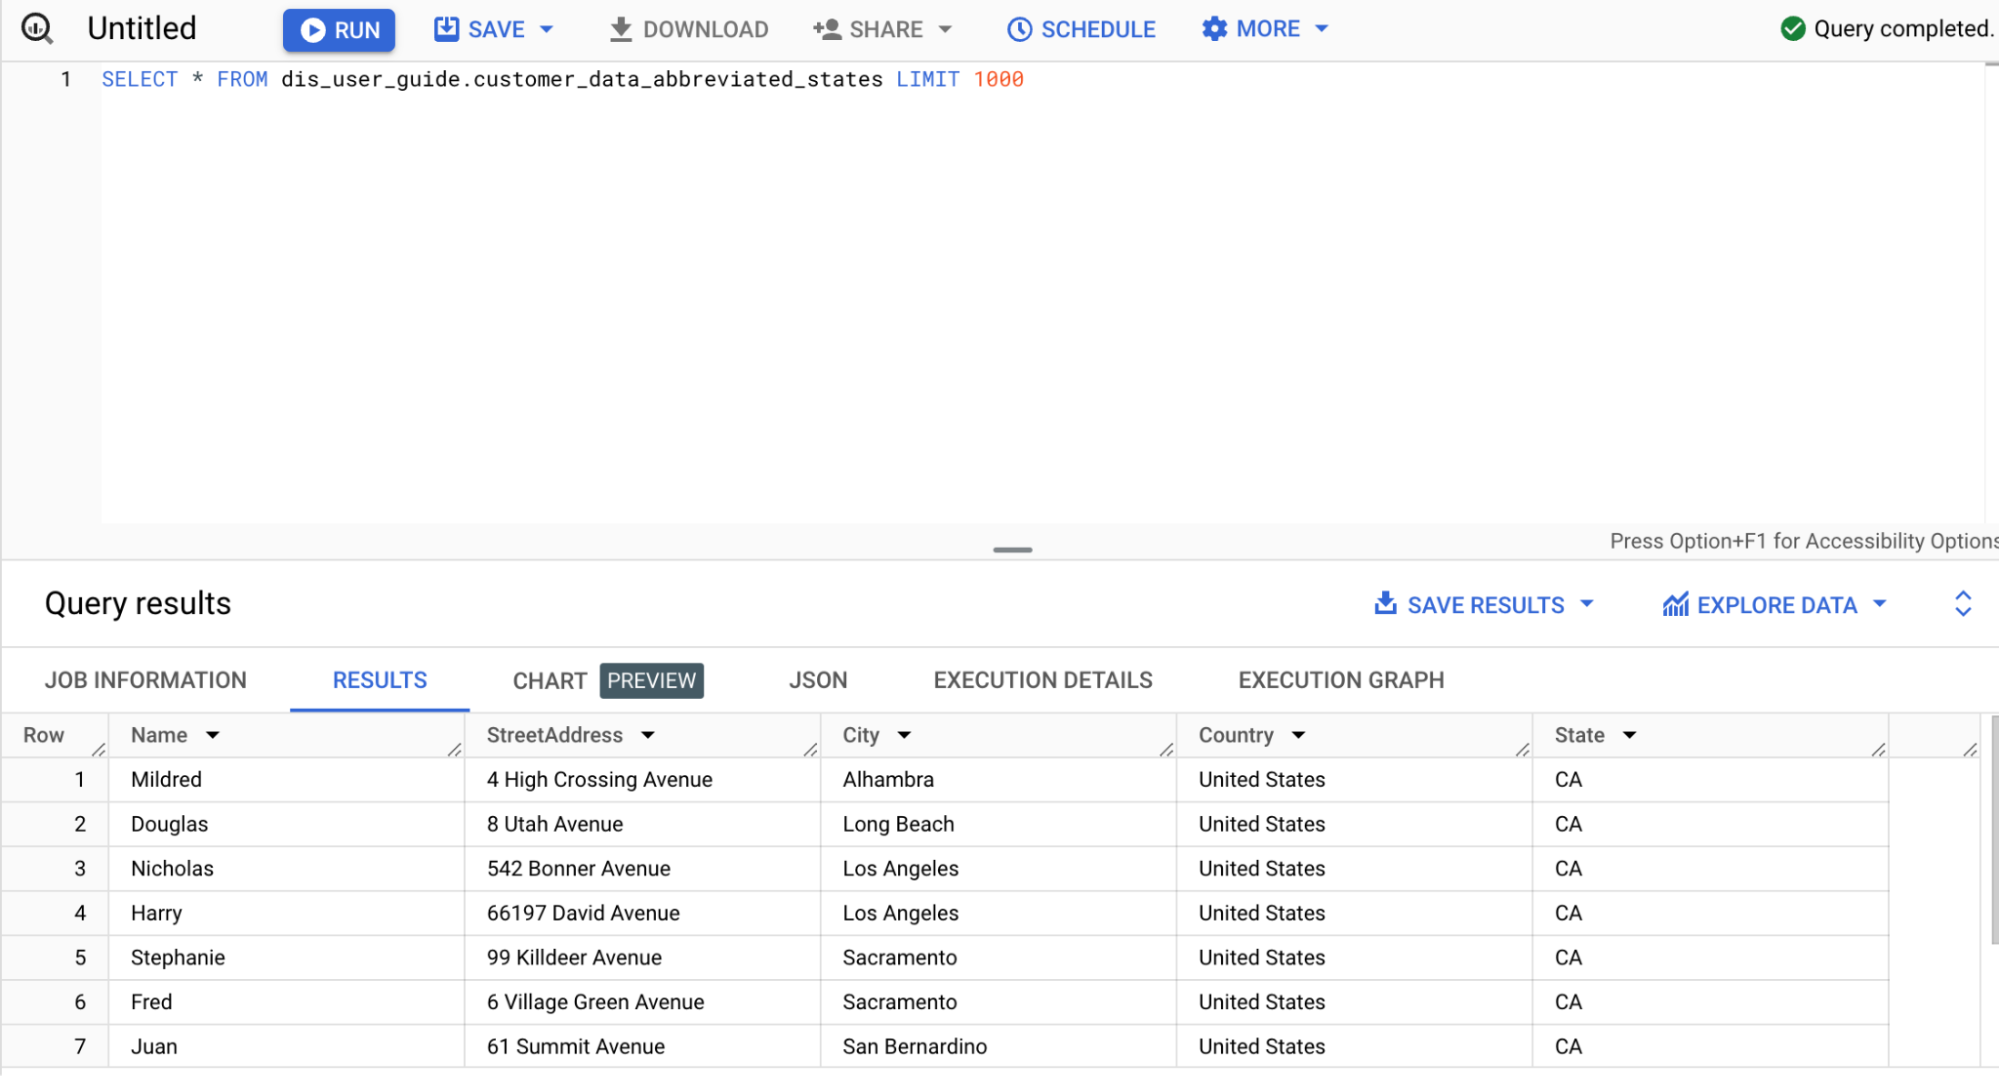
You have successfully created a data pipeline.
Clean up
To avoid incurring charges to your Google Cloud account for the resources used on this page, follow these steps.
Delete the BigQuery dataset
To delete the BigQuery dataset that you created in this tutorial, do the following:
- In the Google Cloud console, go to the BigQuery page.
- Select the
dis_user_guidedataset. - Click delete Delete dataset.
Delete the Cloud Data Fusion instance
Follow these instructions to delete your Cloud Data Fusion instance.
Delete the project
The easiest way to eliminate billing is to delete the project that you created for the tutorial.
To delete the project:
- In the Google Cloud console, go to the Manage resources page.
- In the project list, select the project that you want to delete, and then click Delete.
- In the dialog, type the project ID, and then click Shut down to delete the project.
What's next
- Learn more about Cloud Data Fusion.
