Custom payload for Dialogflow CX lets you enhance your virtual agent experience beyond plain text-based chat and interactions. By using custom payloads in Dialogflow CX, you can configure your virtual agent to render custom responses and citations.
Custom response message types
Custom responses lets you render the following messages types:
Text
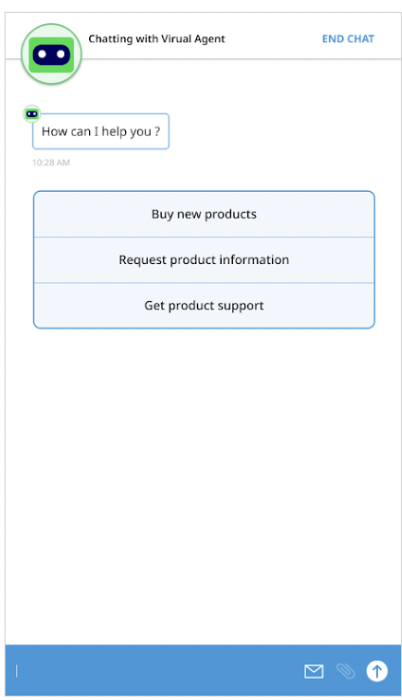
Inline buttons
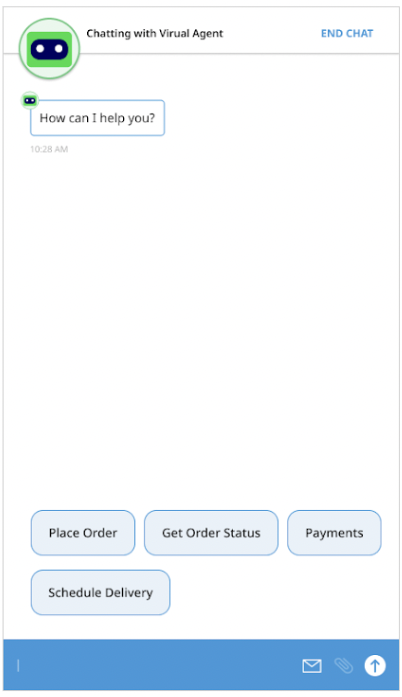
Sticky buttons
Images
Videos
Documents
Complex views (combination one or more message types)
Custom actions allow virtual agents to perform the following actions:
Escalations to human agents
Planned transfers to human agents
End support session
Contact Center AI Platform (CCAI Platform) payload
To be used in Dialogflow CX as the custom payload. The following example demonstrates the format for responses in the webSDK using Dialogflow CX.
{
  "ujet": {
    "type": "text|inline_button|sticky_button|image|video|document|complex|action",
    "action": "escalation|end",
    "title": "message displayed on the top of the message",
    "escalation_reason": "by_consumer|by_virtual_agent",
    "session_variable": {
      "capture_target": "payload|end_user_response",
      "capture_key": "key",
      "payload": {
      }
    },
    "messages": [
      "Hello",
      "How can I help you?"
    ],
    "buttons": [
      {
        "title": "Button 1",
        "action": "quick_reply"
      },
      {
        "title": "Button 2",
        "action": "quick_reply"
      }
    ],
    "images": [
      {
        "url": "https://image.url",
        "text": "an alternate text for an image for when failed to load an image"
      },
      {
        "url": "https://image.url",
        "text": "an alternate text for an image"
      }
    ],
    "videos": [
      {
        "url": "https://video.url",
        "text": "an alternate text for a video for when failed to load a video"
      },
      {
        "url": "https://video.url",
        "text": "an alternate text for a video"
      }
    ],
    "documents": [
      {
        "url": "https://document.url",
        "text": "an alternate text for a document for when failed to load a document"
      },
      {
        "url": "https://document.url",
        "text": "an alternate text for a document"
      }
    ],
    "components": [
      {
        "type": "text",
        "messages": [
          "We need the information for helping you.",
          "Could you please choose the following options?"
        ]
      },
      {
        "type": "inline_button",
        "buttons": [
          {
            "title": "Button 1",
            "action": "quick_reply"
          },
          {
            "title": "Button 2",
            "action": "quick_reply"
          }
        ]
      },
      {
        "type": "image",
        "images": [
          {
            "url": "https://image.url",
            "text": "an alternate text for an image for when failed to load an image"
          },
          {
            "url": "https://image.url",
            "text": "an alternate text for an image"
          }
        ]
      }
    ]
  }
}
Chat message format for custom payload
Used with the CCAI Platform SDK to show a proper UI. It is the same with Dialogflow CX custom payload format but doesn't have "ujet" field in the root.
See the following examples for further details.
Examples
The following sections include example payloads that can be used in Dialogflow CX,
Text
{
  "ujet": {
    "type": "text",
    "messages": [
      "Hello",
      "How can I help you?"
    ]
  }
}
>Escalation to the same queue
By virtual agent:
{
  "ujet": {
    "type": "action",
    "action": "escalation",
    "escalation_reason": "by_virtual_agent"
  }
}
By consumer:
{
  "ujet": {
    "type": "action",
    "action": "escalation",
    "escalation_reason": "by_consumer"
  }
}
Escalation to the targeted queue
By virtual agent:
{
  "ujet": {
    "type": "action",
    "action": "escalation",
    "escalation_reason": "by_virtual_agent",
    "menu_id": 100,
    "language": "ko"
  }
}
By consumer:
{
  "ujet": {
      "type": "action",
      "action": "escalation",
      "escalation_reason": "by_consumer",
      "menu_id": 100,
      "language": "ko"
  }
}
End conversation
{
  "ujet": {
    "type": "action",
    "action": "end"
  }
}
Inline button
{
  "ujet": {
    "type": "inline_button",
    "title": "Select a menu",
    "buttons": [
      {
        "title": "Lorem Ipsum",
        "action": "quick_reply"
      },
      {
        "title": "Lorem Ipsum Dolor Sit Amet",
        "action": "escalation"
      }
    ]
  }
}
Example

Sticky button
{
  "ujet": {
    "type": "sticky_button",
    "title": "Select a menu",
    "buttons": [
      {
        "title": "Lorem Ipsum",
        "action": "quick_reply"
      },
      {
        "title": "Lorem Ipsum Dolor Sit Amet",
        "action": "escalation"
      }
    ]
  }
}
Example

Image view
{
  "ujet": {
    "type": "image",
    "title": "Please see the following images",
    "images": [
      {
        "url": "https://image1.url",
        "text": "an alternate text for an image for when failed to load an image"
      },
      {
        "url": "https://image2.url",
        "text": "an alternate text for an image"
      }
    ]
  }
}
Video view
{
  "ujet": {
    "type": "video",
    "title": "Please see the following videos",
    "videos": [
      {
        "url": "https://video1.url",
        "text": "an alternate text for a video for when failed to load a video"
      },
      {
        "url": "https://video2.url",
        "text": "an alternate text for a video"
      }
    ]
  }
}
Document View
{
  "ujet": {
    "type": "document",
    "title": "Please see the following document",
    "documents": [
      {
        "url": "https://document1.url",
        "text": "an alternate text for a document for when failed to load a document"
      },
      {
        "url": "https://document2.url",
        "text": "an alternate text for a document"
      }
    ]
  }
}
Complex view
{
  "ujet": {
    "type": "complex",
    "type": "Welcome to CCAI Platform world!",
    "components": [
      {
        "type": "text",
        "messages": [
          "We need the information for helping you.",
          "Could you please choose the following options?"
        ]
      },
      {
        "type": "inline_button",
        "buttons": [
          {
            "title": "Button 1",
            "action": "quick_reply"
          },
          {
            "title": "Button 2",
            "action": "quick_reply"
          }
        ]
      },
      {
        "type": "image",
        "images": [
          {
            "url": "https://image1.url",
            "text": "an alternate text for an image for when failed to load an image"
          },
          {
            "url": "https://image2.url",
            "text": "an alternate text for an image"
          }
        ]
      }
    ]
  }
}
Configuring a custom payload in Dialogflow
For more information on how to configure your custom payload using Dialogflow, refer to Custom payload responses (Dialogflow ES) or Custom payload (Dialogflow CX) resources.
For more information, see Custom session variables for custom payload handling.
Virtual agent transfer to a phone number or SIP endpoint
You can use Dialogflow CX custom payloads to transfer calls from a voice virtual agent to the phone number or SIP endpoint that you specify. If the connection is successful, the virtual agent is removed from the call and the call continues. If the connection fails, a transfer failure message is played and the call continues with the virtual agent.
Virtual agent transfers work for both internal and external calls. Virtual agent
transfers are recorded as Planned Transfers in reporting.
Transfer a call to a phone number
To transfer a call from a virtual agent to a phone number, use a Dialogflow CX payload similar to the following code sample:
{
  "ujet": {
    "type": "action",
    "action": "deflection",
    "deflection_type" : "phone",
    "phone_number": "+16509424879"
  }
}
Transfer a call to a SIP endpoint
To transfer a call from a virtual agent to a SIP endpoint in the standard way, use a Dialogflow CX payload similar to the following code sample:
{
  "ujet": {
    "type": "action",
    "action": "deflection",
    "deflection_type" : "sip",
    "sip_uri": "sip:1-999-123-4567@voip-provider.example.net"
  }
}
Transfer a call to a SIP endpoint using the SIP REFER method
To transfer a call from a virtual agent to a SIP endpoint using the SIP REFER method, use a Dialogflow CX payload similar to the following code sample. With the SIP REFER method, you can pass useful information using the header properties.
{
    "ujet": {
       "type": "action",
       "action": "deflection",
       "deflection_type" : "sip"
       "sip_uri": "sip:1-999-123-4567@voip-provider.example.net"
       "sip_refer": true
       "sip_parameters": {
       "x-header": "value",
       "x-header": "value"
       }
    }
}
Custom Session variables for custom payload handling
Use custom session variables to capture values from the intent response and the end-user response, then collect all of them and upload them to CRM as a comment.
Capture from the end user response
Flow
CCAI Platform requests the response to Dialogflow CX.
Dialogflow CX may callback to the customer's server by Fulfillment.
The customer's server is supposed to fill session_variable field in the response.
Dialogflow CX returns the response with the custom payload including
session_variablefield with capture_target =end_user_responseAn end-user sends a message.
CCAI Platform keeps the end-user message that was sent in the previous step.
CCAI Platform will post all session variables which have been captured in the chat session to CRM as a comment when a virtual agent left from a chat.
Custom payload format
{
  "ujet": {
    "session_variable": {
      "capture_target": "end_user_response",
      "capture_key": "key"
    }
  }
}
The next consumer message immediately after a virtual agent sends a custom payload will be captured as a session variable with the key "key".
Capture from intent response
Flow
The CCAI Platform requests the response to Dialogflow CX.
Dialogflow CX may call it back to the customer's server by Fulfillment.
The customer's server is supposed to fill
session_variablefield in the response.
Dialogflow CX returns the response with the custom payload including
session_variablefield withcapture_target = "payload".The CCAI Platform Server keeps
payloadobject in step 2.
The CCAI Platform will post all session variables which have been captured in the chat session to CRM as a comment when a virtual agent left from a chat.
Custom payload format
{
  "ujet": {
    "session_variable": {
        "capture_target": "payload",
        "payload": {
          "status": "STATUS",
          "order_id": "ORDER_ID",
          "personal_id": "PERSONAL_ID"
        },
        "invisible_to_agent": ["INVISIBLE_TO_AGENT"]
      }
  }
}
Replace the following:
STATUS: the status of the orderORDER_ID: the order IDPERSONAL_ID: an identifier of the end-user.INVISIBLE_TO_AGENT: An array of properties that you don't want to be visible in the agent adapter. For example, a value of"personal_id"here would prevent thepersonal_idproperty from displaying in the agent adapter. For more information, see View session data in the agent adapter.
Custom session variable upload on CRM
For each session variable, the server is supposed to gather all session variables internally then upload them on CRM when a virtual agent leaves.
CRM message example
    ###########################

    Chat ID: 1
    Menu ID: 1
    Chatbot Platform: Platform Name
    Chatbot Workflow: Workflow Name
    Virtual Agent: Virtual Agent Name

    ###########################

    Intent: Intent Captured from End User Response
    Captured At: 2020-06-25 14:54:19

    Captured Variables
    request: Cancel Order

    ###########################

    Intent: Intent Captured from Payload
    Captured At: 2020-06-25 14:58:23

    Captured Variables
    status: Cancelled
    order_id: #12345

    ###########################
Example scenario
The following is a sample conversation that shows the different steps and the messages exchanged between the virtual agent and the end-user.
Step 1
Chat message from virtual agent
How can I help you?
(Button) Show my orders
(Button) Cancel an order
Intent response (custom payload)
{
  "ujet": {
    "type": "inline_button",
    "title": "How can I help you?",
    "buttons": [
      {
        "title": "Show my orders",
        "action": "quick_reply"
      },
      {
        "title": "Cancel an order",
        "action": "quick_reply"
      }
    ]
  }
}
Captured session variable
None
Step 2
Chat message from end-user
Click "Cancel an order" button.
Captured session variable
None
Step 3
Chat message from virtual agent
Can you provide the order id please
Intent response (custom payload)
{
  "ujet": {
    "type": "text"
    "messages": [
      "Can you provide the order id please"
    ],
    "session_variable": {
       "capture_target": "end_user_response",
       "capture_key": "order_id";
    }
  }
}
Captured session variable
None
Step 4
Chat message from end-user
Order id is #12345
Captured session variable
order_id: "Order ID is #12345"
Step 5
Chat message from virtual agent
Order #12345 is cancelled.
Do you need anything else?
Intent response (custom payload)
{
  "ujet": {
    "type": "text",
    "messages": [
      "Order #12345 is canceled.",
      "Do you need anything else?"
    ],
    "session_variable": {
      "capture_target": "payload",
      "payload": {
        "order_id": "#12345",
        "order_status": "cancelled"
      }
    }
  }
}
Captured session variable
order_id: "#12345",
order_status: canceled
Step 6
Chat message from end-user
I would like to speak with a human agent.
Step 7
Chat message from virtual agent
Virtual Agent is left from the conversation.
{
  "ujet": {
    "type": "escalation",
    "escalation_reason": "by_consumer"
  }
}
Custom session variable upload on CRM
From the previous scenario, the following comment posts on the CRM ticket:
    ---------------------------------

    Chat ID: 1
    Menu ID: 1
    Chatbot Platform: Platform Name
    Chatbot Workflow: Workflow Name
    Virtual Agent: Virtual Agent Name

    --------------------------------

    Intent: Intent Captured from End User Response
    Captured At: 2020-06-25 14:54:19

    Captured Variables
    order_id: Order id is #12345.

    --------------------------------

    Intent: Intent Captured from Payload
    Captured At: 2020-06-25 14:58:23

    Captured Variables
    order_id: #12345
    order_status: canceled

    --------------------------------
Configure content cards
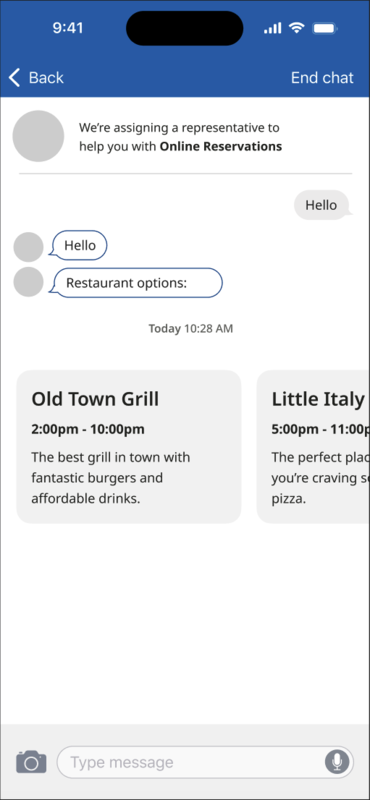
Content cards display concise and visually appealing content in a card-like format, creating simpler interactions for the end-user to consume the presented information. You can create content cards using Dialogflow CX and customize them with titles, subtitles, and body text.
The following example uses content cards to display restaurant options to the end-user:

Content card properties
| Property Name | Description | Required | Type |
|---|---|---|---|
title |
The title of the card. | Yes | String |
subtitle |
The subtitle of the card. | No | String |
body |
The description of the content card. | Yes | String |
link |
A web page link or a deep link. The SDK will use the OS capabilities to open it. | No | String |
event_params |
A dictionary containing extra information about the click event. The SDK will use this. | No | Dictionary |
Dialogflow CX payload: Add validation and accept the content card type
A specific Dialogflow CX payload type handles content cards when messages from end-users are received through the chatbot server. The following is an example of a Dialogflow CX payload:
{
  "ujet": {
    "type": "content_card",
    "cards": [
      {
        "title": "Title",
        "subtitle": "Subtitle",
        "body": "Body",
        "link": "app://page",
        "event_params": {} # for deep-link click event
      }
    ]
  }
}
Information about content cards in CRM chat history
Card title information is logged to keep track of which cards the end-user has clicked on. This information is recorded in the CRM chat history.
In the following example, the chat message history in CRM displays the content card interaction.
[Chat message history]
ID: 305   |   2023-07-06     PDT
--------------------------------------------------
[01:13:32     VA]     Welcome message

[01:14:35     Mobile U.]     Content Cards:
- Title 1
- Title 2
Log content card title click events
To log when an end-user clicks on the title of a content card, use the following format to capture the event:
{end_user_name} clicked on the '{title}' card.
Note Title: Content Card click
Note Comment: 'John Doe' clicked on the 'See our new website' card.
Create a content card click event using the End User Event API
When an end-user clicks on the title of a content card, you can record this event by sending a POST request to the specified URL along with the title of the clicked card.
API endpoint: POST /api/v2/chat/:id/end_user_event
Usage: Create content card click event.
URL: /api/v2/chats/:id/end_user_event
Method: POST
Parameters:
| Field | Type | Description |
|---|---|---|
event |
object | |
event.name |
string | For content card click events use content_card_clicked. |
event.payload |
object | |
event.payload.title |
string | Enter the title of the clicked card. |
(Optional) end_user_name |
string | Enter the end-user's name. If left blank, the name will be retrieved from the CRM. |
Example request:
{
  "event": {
    "name": "content_card_clicked",
    "payload": {
      "title": "New our website"
    }
  },
  "end_user_name": "consumer 1"   ## optional
}
Response: Status: 202 Accepted
