Generate and search multimodal embeddings
This tutorial shows how to generate and search multimodal embeddings for images and text using BigQuery and Vertex AI. It guides you through the end-to-end process of creating multimodal embeddings for images and text, and then performing a cross-modality text-to-image semantic search.
This tutorial covers the following tasks:
- Creating a BigQuery object table over image data in a Cloud Storage bucket.
- Exploring the image data by using a Colab Enterprise notebook in BigQuery.
- Creating a BigQuery ML
remote model
that targets the
Vertex AI
multimodalembeddingfoundation model. - Using the remote model with the
ML.GENERATE_EMBEDDINGfunction to generate embeddings from the images in the object table. - Correct any embedding generation errors.
- Optionally, creating a vector index to index the image embeddings.
- Creating a text embedding for a given search string.
- Using the
VECTOR_SEARCHfunction to search for image embeddings that are similar to the text embedding. - Visualizing the results by using a notebook.
This tutorial uses the public domain art images from
The Metropolitan Museum of Art that are available
in the public Cloud Storage
gcs-public-data--met bucket.
Required permissions
To run this tutorial, you need the following Identity and Access Management (IAM) permissions:
To create a connection, you need membership in the BigQuery Connection Admin (
roles/bigquery.connectionAdmin) role.To grant permissions to the connection's service account, you need the
resourcemanager.projects.setIamPolicypermission.To create and run notebooks, you need the following IAM permissions:
resourcemanager.projects.getresourcemanager.projects.listbigquery.config.getbigquery.jobs.createbigquery.readsessions.createbigquery.readsessions.getDatabigquery.readsessions.updateresourcemanager.projects.getresourcemanager.projects.listdataform.locations.getdataform.locations.listdataform.repositories.createdataform.repositories.listdataform.collections.createdataform.collections.listaiplatform.notebookRuntimeTemplates.applyaiplatform.notebookRuntimeTemplates.getaiplatform.notebookRuntimeTemplates.listaiplatform.notebookRuntimeTemplates.getIamPolicyaiplatform.notebookRuntimes.assignaiplatform.notebookRuntimes.getaiplatform.notebookRuntimes.listaiplatform.operations.list
You can get these permissions from the following IAM roles:
- BigQuery Read Session User (
roles/bigquery.readSessionUser) - BigQuery Studio User (
roles/bigquery.studioUser)
The IAM permissions needed in this tutorial for the remaining BigQuery operations are included in the following two roles:
- BigQuery Data Editor (
roles/bigquery.dataEditor) to create models, tables, and indexes. - BigQuery User (
roles/bigquery.user) to run BigQuery jobs.
- BigQuery Data Editor (
Costs
In this document, you use the following billable components of Google Cloud:
- BigQuery ML: You incur costs for the data that you process in BigQuery.
- Vertex AI: You incur costs for calls to the Vertex AI service that's represented by the remote model.
To generate a cost estimate based on your projected usage,
use the pricing calculator.
For more information about BigQuery pricing, see BigQuery pricing in the BigQuery documentation.
For more information about Vertex AI pricing, see the Vertex AI pricing page.
Before you begin
-
In the Google Cloud console, on the project selector page, select or create a Google Cloud project.
-
Make sure that billing is enabled for your Google Cloud project.
-
Enable the BigQuery, BigQuery Connection, and Vertex AI APIs.
- Enable BigQuery Studio.
Create a dataset
Create a BigQuery dataset to store your ML model.
Console
In the Google Cloud console, go to the BigQuery page.
In the Explorer pane, click your project name.
Click View actions > Create dataset.

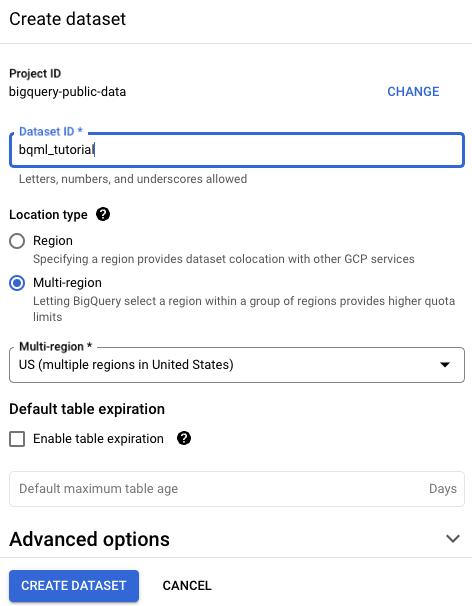
On the Create dataset page, do the following:
For Dataset ID, enter
bqml_tutorial.For Location type, select Multi-region, and then select US (multiple regions in United States).
The public datasets are stored in the
USmulti-region. For simplicity, store your dataset in the same location.- Leave the remaining default settings as they are, and click Create dataset.

bq
To create a new dataset, use the
bq mk command
with the --location flag. For a full list of possible parameters, see the
bq mk --dataset command
reference.
Create a dataset named
bqml_tutorialwith the data location set toUSand a description ofBigQuery ML tutorial dataset:bq --location=US mk -d \ --description "BigQuery ML tutorial dataset." \ bqml_tutorial
Instead of using the
--datasetflag, the command uses the-dshortcut. If you omit-dand--dataset, the command defaults to creating a dataset.Confirm that the dataset was created:
bq ls
API
Call the datasets.insert
method with a defined dataset resource.
{
  "datasetReference": {
     "datasetId": "bqml_tutorial"
  }
}
Create a connection
Create a Cloud resource connection and get the connection's service account ID. Create the connection in the same location as the dataset that you created in the previous step.
Select one of the following options:
Console
Go to the BigQuery page.
To create a connection, click Add, and then click Connections to external data sources.
In the Connection type list, select Vertex AI remote models, remote functions and BigLake (Cloud Resource).
In the Connection ID field, enter a name for your connection.
Click Create connection.
Click Go to connection.
In the Connection info pane, copy the service account ID for use in a later step.
bq
In a command-line environment, create a connection:
bq mk --connection --location=REGION --project_id=PROJECT_ID \
    --connection_type=CLOUD_RESOURCE CONNECTION_ID
The
--project_idparameter overrides the default project.Replace the following:
REGION: your connection regionPROJECT_ID: your Google Cloud project IDCONNECTION_ID: an ID for your connection
When you create a connection resource, BigQuery creates a unique system service account and associates it with the connection.
Troubleshooting: If you get the following connection error, update the Google Cloud SDK:
Flags parsing error: flag --connection_type=CLOUD_RESOURCE: value should be one of...
Retrieve and copy the service account ID for use in a later step:
bq show --connection PROJECT_ID.REGION.CONNECTION_ID
The output is similar to the following:
name                          properties
1234.REGION.CONNECTION_ID     {"serviceAccountId": "connection-1234-9u56h9@gcp-sa-bigquery-condel.iam.gserviceaccount.com"}
Terraform
Use the
google_bigquery_connection
resource.
To authenticate to BigQuery, set up Application Default Credentials. For more information, see Set up authentication for client libraries.
The following example creates a Cloud resource connection named
my_cloud_resource_connection in the US region:
To apply your Terraform configuration in a Google Cloud project, complete the steps in the following sections.
Prepare Cloud Shell
- Launch Cloud Shell.
-
Set the default Google Cloud project where you want to apply your Terraform configurations.
You only need to run this command once per project, and you can run it in any directory.
export GOOGLE_CLOUD_PROJECT=PROJECT_ID
Environment variables are overridden if you set explicit values in the Terraform configuration file.
Prepare the directory
Each Terraform configuration file must have its own directory (also called a root module).
-
In Cloud Shell, create a directory and a new
file within that directory. The filename must have the
.tfextension—for examplemain.tf. In this tutorial, the file is referred to asmain.tf.mkdir DIRECTORY && cd DIRECTORY && touch main.tf
-
If you are following a tutorial, you can copy the sample code in each section or step.
Copy the sample code into the newly created
main.tf.Optionally, copy the code from GitHub. This is recommended when the Terraform snippet is part of an end-to-end solution.
- Review and modify the sample parameters to apply to your environment.
- Save your changes.
-
Initialize Terraform. You only need to do this once per directory.
terraform init
Optionally, to use the latest Google provider version, include the
-upgradeoption:terraform init -upgrade
Apply the changes
-
Review the configuration and verify that the resources that Terraform is going to create or
update match your expectations:
terraform plan
Make corrections to the configuration as necessary.
-
Apply the Terraform configuration by running the following command and entering
yesat the prompt:terraform apply
Wait until Terraform displays the "Apply complete!" message.
- Open your Google Cloud project to view the results. In the Google Cloud console, navigate to your resources in the UI to make sure that Terraform has created or updated them.
Grant permissions to the connection's service account
Grant the connection's service account the appropriate roles to access the Cloud Storage and Vertex AI services. You must grant these roles in the same project you created or selected in the
Before you begin section. Granting the roles in a different project results in the error bqcx-1234567890-xxxx@gcp-sa-bigquery-condel.iam.gserviceaccount.com does not have the permission to access resource.
To grant the appropriate roles, follow these steps:
Go to the IAM & Admin page.
Click Grant Access.
In the New principals field, enter the service account ID that you copied earlier.
In the Select a role field, choose Vertex AI, and then select Vertex AI User.
Click Add another role.
In the Select a role field, choose Cloud Storage, and then select Storage Object Viewer.
Click Save.
Create the object table
Create an object table over the art images in the public Cloud Storage
gcs-public-data--met bucket.
The object table makes it possible to analyze the images without moving them
from Cloud Storage.
In the Google Cloud console, go to the BigQuery page.
In the query editor, run the following query:
CREATE OR REPLACE EXTERNAL TABLE `bqml_tutorial.met_images`
WITH CONNECTION `LOCATION.CONNECTION_ID`
OPTIONS
  ( object_metadata = 'SIMPLE',
    uris = ['gs://gcs-public-data--met/*']
  );
Replace the following:
LOCATION: the connection location.CONNECTION_ID: the ID of your BigQuery connection.When you view the connection details in the Google Cloud console, this is the value in the last section of the fully qualified connection ID that is shown in Connection ID, for example
projects/myproject/locations/connection_location/connections/myconnection.
Explore the image data
Create a Colab Enterprise notebook in BigQuery to explore the image data.
In the Google Cloud console, go to the BigQuery page.
Set up the notebook:
- Add a code cell to the notebook.
Copy and paste the following code into the code cell:
#@title Set up credentials

from google.colab import auth
auth.authenticate_user()
print('Authenticated')

PROJECT_ID='PROJECT_ID'
from google.cloud import bigquery
client = bigquery.Client(PROJECT_ID)
Replace
PROJECT_IDwith the name of the project that you are using for this tutorial.Run the code cell.
Enable table display:
- Add a code cell to the notebook.
Copy and paste the following code into the code cell:
#@title Enable data table display
%load_ext google.colab.data_table
Run the code cell.
Create a function to display the images:
- Add a code cell to the notebook.
Copy and paste the following code into the code cell:
#@title Util function to display images
import io
from PIL import Image
import matplotlib.pyplot as plt
import tensorflow as tf

def printImages(results):
 image_results_list = list(results)
 amt_of_images = len(image_results_list)

 fig, axes = plt.subplots(nrows=amt_of_images, ncols=2, figsize=(20, 20))
 fig.tight_layout()
 fig.subplots_adjust(hspace=0.5)
 for i in range(amt_of_images):
   gcs_uri = image_results_list[i][0]
   text = image_results_list[i][1]
   f = tf.io.gfile.GFile(gcs_uri, 'rb')
   stream = io.BytesIO(f.read())
   img = Image.open(stream)
   axes[i, 0].axis('off')
   axes[i, 0].imshow(img)
   axes[i, 1].axis('off')
   axes[i, 1].text(0, 0, text, fontsize=10)
 plt.show()
Run the code cell.
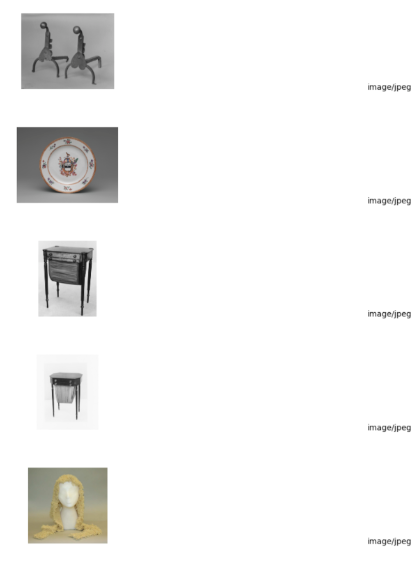
Display the images:
- Add a code cell to the notebook.
Copy and paste the following code into the code cell:
#@title Display Met images

inspect_obj_table_query = """
SELECT uri, content_type
FROM bqml_tutorial.met_images
WHERE content_type = 'image/jpeg'
Order by uri
LIMIT 10;
"""
printImages(client.query(inspect_obj_table_query))
Run the code cell.
The results should look similar to the following:

Save the notebook as
met-image-analysis.
Create the remote model
Create a remote model that represents a hosted Vertex AI multimodal embedding model:
In the Google Cloud console, go to the BigQuery page.
In the query editor, run the following query:
CREATE OR REPLACE MODEL `bqml_tutorial.multimodal_embedding_model`
  REMOTE WITH CONNECTION `LOCATION.CONNECTION_ID`
  OPTIONS (ENDPOINT = 'multimodalembedding@001');
Replace the following:
LOCATION: the connection location.CONNECTION_ID: the ID of your BigQuery connection.When you view the connection details in the Google Cloud console, this is the value in the last section of the fully qualified connection ID that is shown in Connection ID, for example
projects/myproject/locations/connection_location/connections/myconnection.
The query takes several seconds to complete, after which the
multimodal_embedding_modelmodel appears in thebqml_tutorialdataset in the Explorer pane. Because the query uses aCREATE MODELstatement to create a model, there are no query results.
Generate image embeddings
Generate embeddings from the images in the object table by using the
ML.GENERATE_EMBEDDING function,
and then write them to a table for
use in a following step. Embedding generation is an expensive operation, so the
query uses a subquery including the LIMIT clause to limit embedding generation to 10,000 images
instead of embedding the full dataset of 601,294 images. This also helps keep
the number of images under the 25,000 limit for the ML.GENERATE_EMBEDDING
function. This query takes approximately 40 minutes to run.
In the Google Cloud console, go to the BigQuery page.
In the query editor, run the following query:
CREATE OR REPLACE TABLE `bqml_tutorial.met_image_embeddings`
AS
SELECT *
FROM
  ML.GENERATE_EMBEDDING(
    MODEL `bqml_tutorial.multimodal_embedding_model`,
    (SELECT * FROM `bqml_tutorial.met_images` WHERE content_type = 'image/jpeg' LIMIT 10000))
Correct any embedding generation errors
Check for and correct any embedding generation errors. Embedding generation can fail because of Generative AI on Vertex AI quotas or service unavailability.
The ML.GENERATE_EMBEDDING function returns error details in the
ml_generate_embedding_status column. This column is empty if embedding
generation was successful, or contains an error message if embedding
generation failed.
In the Google Cloud console, go to the BigQuery page.
In the query editor, run the following query to see if there were any embedding generation failures:
SELECT DISTINCT(ml_generate_embedding_status),
  COUNT(uri) AS num_rows
FROM bqml_tutorial.met_image_embeddings
GROUP BY 1;
If rows with errors are returned, drop any rows where embedding generation failed:
DELETE FROM `bqml_tutorial.met_image_embeddings`
WHERE ml_generate_embedding_status = 'A retryable error occurred: RESOURCE_EXHAUSTED error from remote service/endpoint.';
Create a vector index
You can optionally use the
CREATE VECTOR INDEX statement
to create the met_images_index vector index on the
ml_generate_embedding_result column of the met_images_embeddings table.
A vector index lets you perform a vector search more quickly, with the
trade-off of reducing recall and so returning more approximate results.
In the Google Cloud console, go to the BigQuery page.
In the query editor, run the following query:
CREATE OR REPLACE
  VECTOR INDEX `met_images_index`
ON
  bqml_tutorial.met_image_embeddings(ml_generate_embedding_result)
  OPTIONS (
    index_type = 'IVF',
    distance_type = 'COSINE');
The vector index is created asynchronously. To check if the vector index has been created, query the
INFORMATION_SCHEMA.VECTOR_INDEXESview and confirm that thecoverage_percentagevalue is greater than0, and thelast_refresh_timevalue isn'tNULL:SELECT table_name, index_name, index_status, coverage_percentage, last_refresh_time, disable_reason FROM bqml_tutorial.INFORMATION_SCHEMA.VECTOR_INDEXES WHERE index_name = 'met_images_index';
Generate an embedding for the search text
To search images that correspond to a specified text search string, you must
first create a text embedding for that string. Use the same remote model to
create the text embedding that you used to create the image embeddings,
and then write the text embedding to a table for use in a following step. The
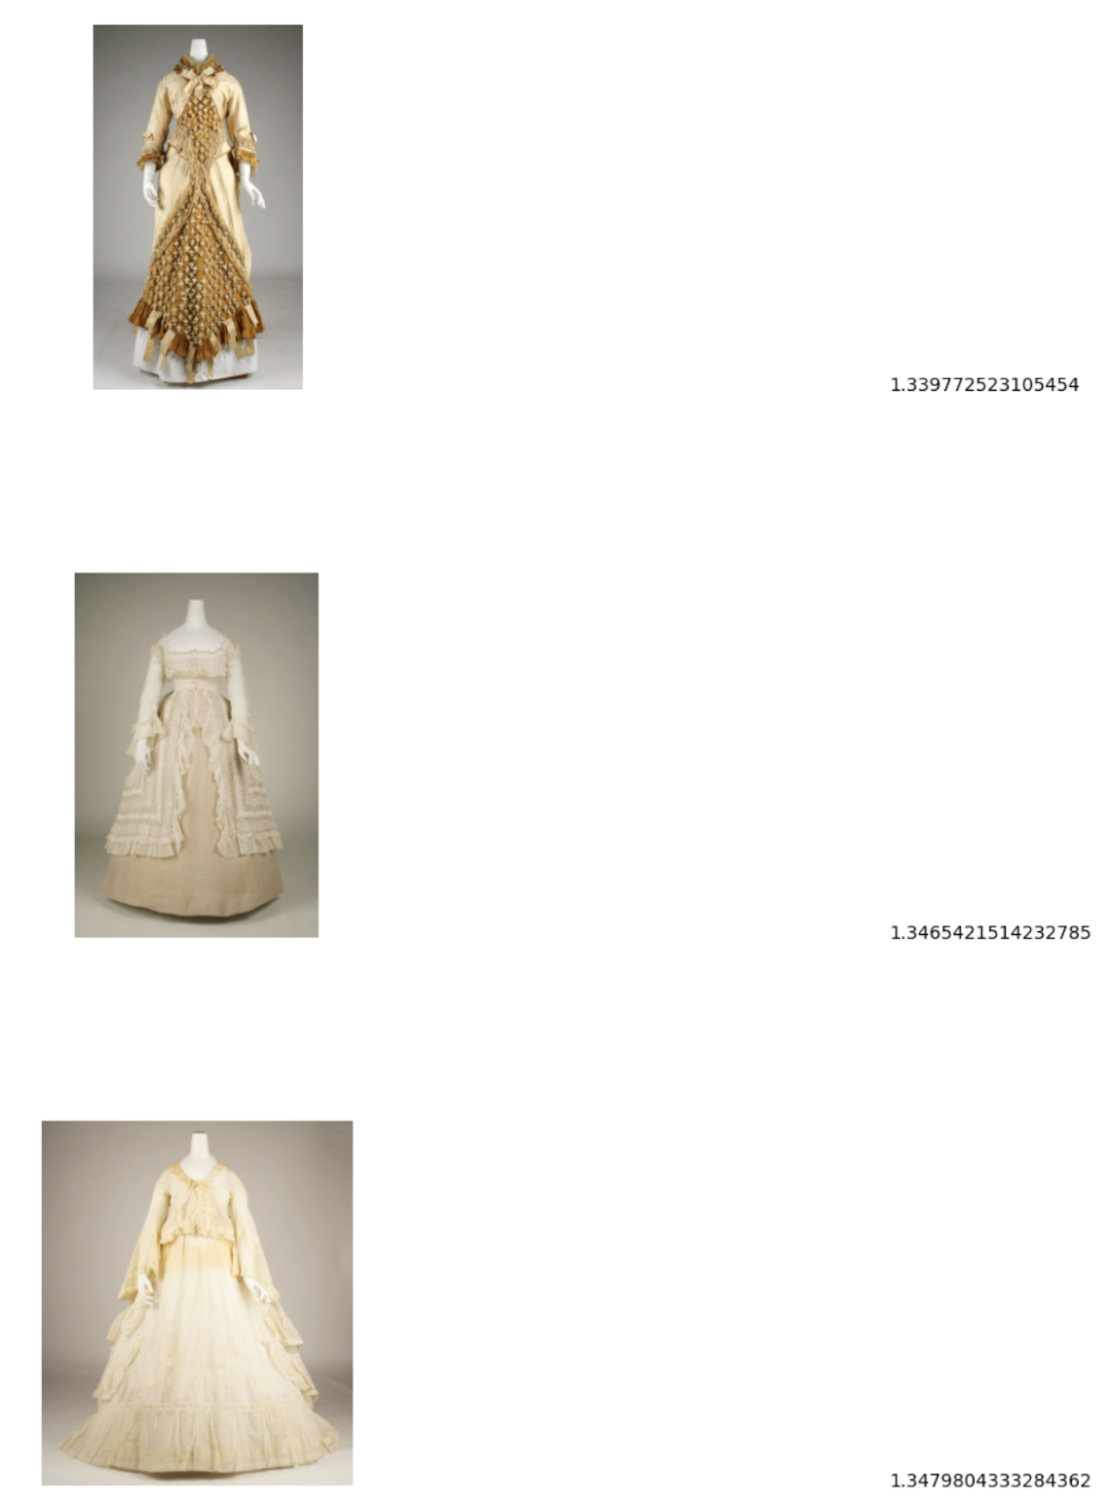
search string is pictures of white or cream colored dress from victorian era.
In the Google Cloud console, go to the BigQuery page.
In the query editor, run the following query:
CREATE OR REPLACE TABLE `bqml_tutorial.search_embedding`
AS
SELECT * FROM ML.GENERATE_EMBEDDING(
  MODEL `bqml_tutorial.multimodal_embedding_model`,
  (
    SELECT 'pictures of white or cream colored dress from victorian era' AS content
  )
);
Perform a cross-modality text-to-image search
Use the
VECTOR_SEARCH function
to search for images that best correspond to the search string represented
by the text embedding, and then write them to a table for
use in a following step.
In the Google Cloud console, go to the BigQuery page.
In the query editor, run the following query:
CREATE OR REPLACE TABLE `bqml_tutorial.vector_search_results` AS
SELECT base.uri AS gcs_uri, distance
FROM
  VECTOR_SEARCH(
    TABLE `bqml_tutorial.met_image_embeddings`,
    'ml_generate_embedding_result',
    TABLE `bqml_tutorial.search_embedding`,
    'ml_generate_embedding_result',
    top_k => 3);
Visualize the vector search results
Visualize the vector search results by using a notebook.
In the Google Cloud console, go to the BigQuery page.
Open the
met-image-analysisnotebook that you created earlier.Visualize the vector search results:
- Add a code cell to the notebook.
Copy and paste the following code into the code cell:
query = """
  SELECT * FROM `bqml_tutorial.vector_search_results`
  ORDER BY distance;
"""

printImages(client.query(query))
Run the code cell.
The results should look similar to the following:

Clean up
- In the Google Cloud console, go to the Manage resources page.
- In the project list, select the project that you want to delete, and then click Delete.
- In the dialog, type the project ID, and then click Shut down to delete the project.
